Archive for the Flight Instruction Category

Practice Forced Landing Briefing: The lesson that never was

Saturday, November 24th, 2012 | Permalink

Normally if the phone rings before 9am on a weekend, it’s the aero club, often a good thing as it means there’s a last minute slot going 🙂    However, on this particular day the phone rang, but realising it was past 9am, this couldn’t be a cancellation.

It was still the aero club, but this time ringing to tell me I was late for my lesson.  ‘Lesson?, I never booked any lesson for this weekend, same time next week is what’s on my phone.’   Other than to suggest in over a year I’ve never missed one yet, we won’t go into who was right or wrong here, it doesn’t matter.

What made this particular call a bit strange was the background banter of whether or not I should just come in anyway:

“Come in….”
“What’s he doing?”
“Practice Forced Landings”
“Oh, well we don’t have the weather for that…”

Maybe I just wasn’t awake enough at the time, but after a debate of whether I could get down there quick enough to still grab the lesson, this banter was some what amusing  🙂

Bad weather seems to leave the instructors filing ‘important paperwork’ (possibly involving coffee and talking about the weather), so it doesn’t always mean it’s a total loss for a student.   I was invited to go down anyway and we’d go through the briefing for the lesson.   Good stuff (and the one thing in flying that is actually free! 🙂 ).

Practice Forced Landings

General idea is to get comfortable with the procedures involved should the engine stop or decide to burst into flames.

Without thrust, the aircraft will assume a landing configuration…….in as much as you’re going down whether you wanted to or not.

In the event such things occur, there’s a sequence of priorities and things to be getting on with in order to maximise the chances of the end result being a landing, rather than a crash.

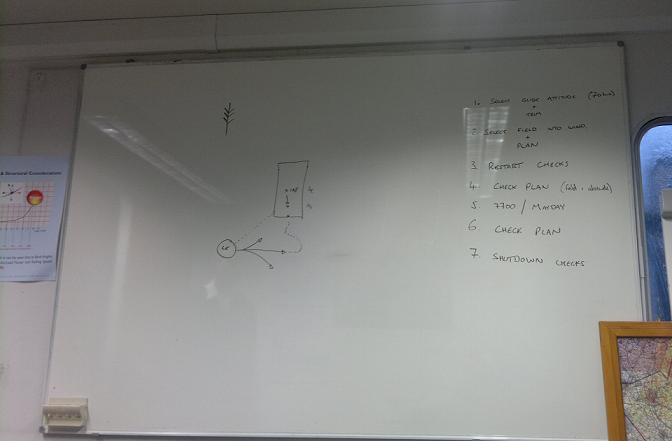
Practice Forced Landing Briefing

Practice Forced Landing Briefing

  1. Set Best Glide Range Airspeed :  70 knots in a Cessna 172 – Anything faster or slower and your glide range will be reduced, though worth noting that best glide range is not the speed to set if you want best glide endurance……..but unless we’re trying to avoid ditching in the sea for the maximum amount of time possible, range is what we want.
  2. Select a Field : It might be a bunch of houses ahead of us, but perhaps there’s a field behind or on the far side of us, you never know your luck maybe even an airfield 🙂     Preferably into wind as this will reduce our ground speed, start planning – can we reach it etc.   When selecting a field, it’s all about the S’s:
    1. Size
    2. Shape
    3. Surface
    4. Slope
    5. Surroundings
  3. Restart Checks :  Assuming this is an engine failure, now we have given ourselves maximum range and know where we’re going to try and put the plane if all else fails, time to see if we can’t get the engine going again.
    1. Mixture:  Is it rich?   Exercise it and reset to rich
    2. Throttle:  Is it open?  Exercise it and set to about half power.
    3. Fuel Shut Off:   Should be ON   (fully pushed in)
    4. Fuel Tanks:  Select Both
    5. Aux. Fuel Pump:  ON
    6. Magnetos:  Left, Right, back to Both
    7. Try Restarting the engine.
  4. Check the Plan:  If it hasn’t restarted, time to double check we can still make the intended field, that nothing new hasn’t now come up to make that original field unusable (e.g. now we can see there are power lines etc.), are we still at the right airspeed.
  5. Distress Call:   Time to wake up the world……7700 on the Transponder to indicate an emergency, radio call “Mayday, Mayday, Mayday <Call Sign> <Type of Emergency> <Location> <Number of Persons on board>”.    Unless by some miracle there is an airfield within glide range, in which case this radio call should be enough to promote you to number 1 in the landing order.   Other than deploying the emergency services, that’s about all Air Traffic can help you with – so unless the engine restarts and the crisis goes away, not much need in talking to them after this.
  6. Check the Plan:  Airspeed / Can we still make it / Is it still the field for us.???
  7. Shutdown Checks:   This plane is now officially no fun, but it’s potentially going to be less fun if you hit the ground with everything live, time to turn it all off (If the emergency was a fire, you’d have already forgotten about restarting it):
    1. Mixture :  Lean / Idle Cut Off
    2. Throttle Closed
    3. Fuel Shutoff:   OFF (Pulled out)
    4. Aux. Fuel Pump:  OFF
    5. Magnetos:  Off

At some point we want to turn the Avionics and Master Switches OFF, however, the Avionics drives the transponder, so we might want to avoid turning that off straight away.   The master switch drives everything, if we turn that off, we’ll lose the avionics, the flaps, the lights…….primarily we’re concerned we might still want those flaps and we won’t want to take them early, because once the height is lost there will be no getting it back.   As a result these will be the last two switches to go off.

Circuit / Approach

As per the sketch on the white board above, the aim is to be at 1000ft at a specific point, or “Low Key” point.   From here the final part of the approach can be flown:

  • Too Low : Fly more directly to the aiming point
  • Too High: Fly away from the aiming point, or ‘S’ turn.

The idea is to aim for a touch down point about half way into the field selected, as the height is lost and it is certain we could make that point, the aiming point is brought closer to around a third into the field.   Though speed needs to be considered, as the book of words says:  “Better to reach the far end at taxi speed……..then to undershoot into the near side hedge at flight speed.”

At around 500ft, staying legal, the practice will be called off and a verdict of whether we’d have made it or not given.  It’s probably ironic that aircraft have some of the toughest design & production certification requirements of any industry – but you won’t find any air bags or crumple zones here, they’re designed for high probability of safety in the air, not crashing into a fence.

Well that’s the general theory…..

Next lesson we’ll see how it turns out in practice 🙂
Lesson 13: Circuit Flying at Christmas (Cancelled)

Tuesday, December 27th, 2011 | Permalink

An unexpected day off in the run-up to Christmas presented an opportunity to begin circuit flying and generally just go flying at Christmas, which seemed like a good idea 🙂

…..unfortunately high cross winds were to scupper any such ideas, as on arrival to the aero club, yet another instructor (in all seriousness, this is starting to get silly!) met me and said we’d have to cancel (13 unlucky for some) – but we could do the briefing.

Briefing

For non-flying readers, circuit flying is essentially flying “laps” of the airport, it’s the pattern planes will enter so they aren’t coming at the runway(s) every which way they feel like.    So an airport might operate a ‘left hand circuit’, this simply means that the circuit is made up of left hand turns.   Height (QFE) of the circuit varies, but is typically 1000ft.

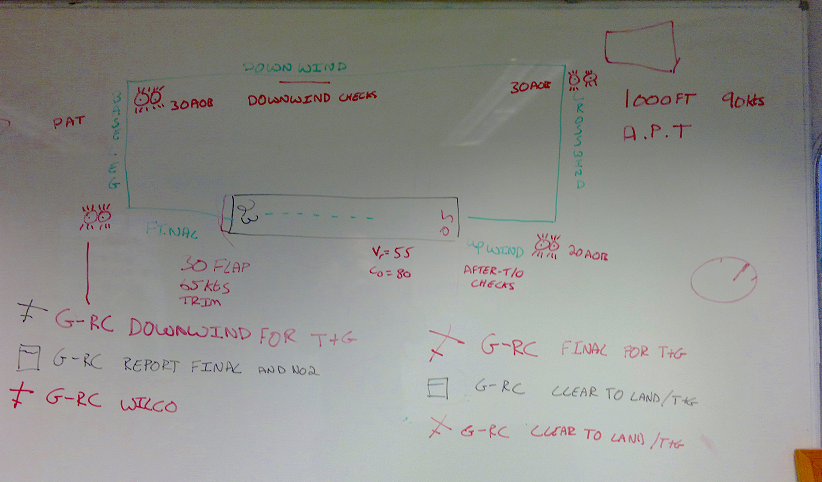
It might be easier with a picture, so here’s the white board from the briefing….

Circuit Flying Briefing White Board

Circuit Flying Briefing White Board

This is a left hand circuit, so the diagram above can be roughly read as:

  1. Vr = Rotate speed, 55 Knots (Cessna 172SP) – bit on that later. The Co of 80knots is Climb Out speed of 80 Knots, this is the speed the club likes to use, 74 would actually be optimum in this plane (according to the aircraft’s book of words).
  2. Climb (Upwind), after 200ft perform after take-off checks
  3. 500ft, using 20 degrees Angle of Bank (AOB) begin a turning left climb onto the Crosswind Leg.
  4. Crosswind Leg :  Level the aircraft off at 1000ft (circuit height), tracking a landmark (red circles with dots in in the diagram above).  APT = Attitude, Power, Trim.   The sequence for leveling off for straight and level flight.
  5. Using 30 degrees angle of bank, turn on to the downwind leg.   Note: We can use 30 degrees because at this point the plane will be flying straight and level – use less in the climb because the risk of stalling are increased.
  6. During the Downwind leg, the radio call is made (see the scribbles below the diagram), T+G =  “Touch and Go”.
  7. Also during the Downwind leg the pre-landing checks need to be run through:  At my aero club these are:
    1. Brakes  : Do we have pressure?
    2. Mixture :  Rich
    3. Fuel : Do we still have plenty, enough to go around etc.?
    4. Harnesses : Everyone strapped in properly?
    5. Hatchess:  Everything locked and secure?
    6. Autopilot:  Off……we’ll do the landing thanks.
  8. Keeping a good lookout and flying against the landmarks to avoid drifting with the wind, turn on to the Base Leg.
  9. Base Leg:  Start the descent for final – PAT (Power, Attitude, Trim), bring the power back into the white arc, lower the initial flaps, turn on to Final.
  10. Final :  Remember that radio call ATC asked for?   Time to declare ourselves on final and get clearance to land (Scribble on the lower right), lower the last stage of flaps (30 degrees) and trim for 65 knots.
  11. And with all that done, all that’s left to do is land the thing…..

Simple……..Now I just need the weather to play nice in the next week and maybe we’ll be able to go and put the theory into practice!

One last note: Remember that rotate speed (55 knots),  well if you’ve read my last few posts, I’ve done take offs in various ways dependant on the instructors preferred style and this is why I’m not a massive fan of flying with different people all the time, but it’s all good.   The constant in my world has been rotating at 65 knots, so me and newest instructor had a bit of a back and forth on what speed I’d rotate at “65…”  “you mean 55”  “No, I mean 65….”.    It’s quite an interesting exercise actually to look online for what others think on this, because it’s far from absolute.

The answer I like the most and I find quite fitting for VFR flight, is

“You have no right looking at the airspeed indicator……once you know it’s alive.  Keep your eyes outside, the plane will take off when its good and ready, the speed is irrelevant.”

I’m sure many an instructor would disagree with that, but it made me laugh and given I’ve been told off many times for “flying on instruments”, it almost has some sanity behind it.

Anyway, it’s something I’ll get a second opinion on in a week or two, I don’t really care who’s right and who’s wrong – I’ll use any number that keeps the examiner happy 🙂

HASELL & HELL : Checks before Stalling

Tuesday, November 15th, 2011 | Permalink

As abbreviated checklists go, these are perhaps the most fitting for the act you’re about to perform…… My next PPL lesson is stalls, so time to engrave these two checks into memory:

HASELL :

H eight……..Height => Time => Safety
Airframe…..Are the flaps etc. as we want them
Security……No loose articles, everything secure – we’ll have enough to be getting on with without stuff flying into the controls!
Engine………Are the “T’s & P'”  (Temperatures & Pressures) in the green, set at the power setting we expect.
Location……Do we know where we are?  & Are we clear of built up areas?
Lookout…….Normally done with a 360 turn, no planes coming anywhere near us any time soon are there?

Now given the airframe won’t change (unless something goes very badly wrong) and it’s unlikely things will become unsecured.   Future maneuvers can be performed with the abbreviated HELL Check.

Height
Engine
Location
Lookout

……..and then for no good reason other than learning an entry of a stall, close the throttle, lift the nose, watch the speed drop and drop and drop and wait for the stall.

Something for a couple of weekends time from now, the observant reader will notice I said that Stalls are my next Proper Lesson.    I say this, because between now and then, I’m booked in to go and do a Night Flight.

If I’ve learnt one thing since starting my PPL training, it’s that all you need is an instructor in the plane and you can pretty much go and try doing anything – to the limits of your current abilities at the time you want to go try it.

Revisiting Flaps

Saturday, September 3rd, 2011 | Permalink

In the previous post I made a correlation between lift and pitch, it’s been bugging me because it was a bit loose and there is a lot more to it, so perhaps an elaboration of the bullet points is in order.

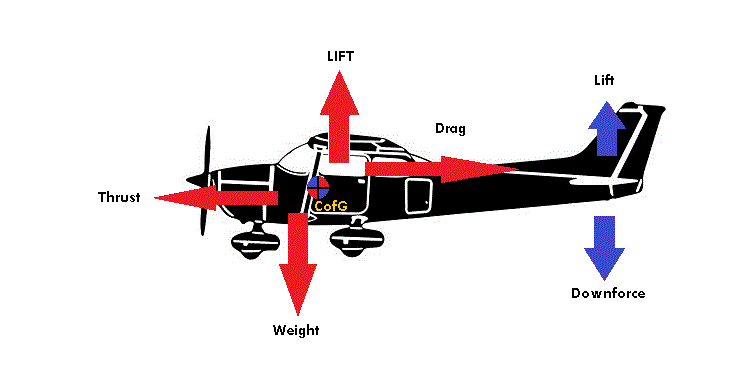
A plane has a number of forces acting upon it.

Cue a diagram:

Cessna Centre of Gravity Forces

Aeroplane Forces

The position of the Centre of Gravity is key and any given aeroplane will have defined limits on how far forward or rearward it can be (outside of which the plane is illegal to fly!).

The reason for this is that the position of the Centre of Gravity impacts planes stability in pitch.   This is because the distance between the Centre of Gravity and the planes stabaliser  (seen above creating lift or downforce), defines the leverage the stabaliser has.

If the distance is very long (centre of gravity is very far forward), then the plane will be very stable in pitch.   However, too stable and the pilot will have no control of the plane.

If the distance is very short (centre of gravity very rearwards), then the plane will be unstable – highly manoeuvrable, but in the extreme it will make the plane tail heavy and the pilot will not be able to stop the plane from wanting to pitch nose up.

So using the diagram above, if the downforce generated by the stabliser increases and overcomes weight the plane will start to pitch nose up.   If the stabaliser starts to generate lift, the plane pitches nose down.

There is a couple around the CofG for thrust and drag, if thrust increases considerably this to will make the plane pitch up……but this is due to a secondary effect.  Increasing thrust will impact the lift/downforce forces – and they will dictate pitch.   Thrust/Drag alone do not make an object change its pitch, you can think of a plane as a car at this point…..but add wings to a car and it becomes a plane because now you have lift & downforce which will either push the thing into the ground or make it take off.

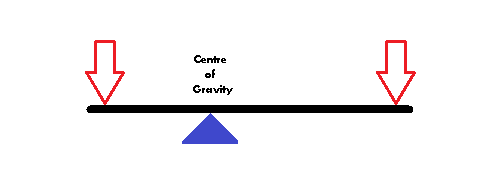
Pitch of an airplane is dictated by its centre of gravity and the forces acting forward or aft in a vertical direction around that lever.

Balance Lever

Balance Lever

If the net forces acting down on the right of the lever is greater than the net forces acting down on the left of the lever……the plane will be pitched nose up.   If it’s reversed, the plane will pitch nose down.

The first diagram shows that if extending flaps to 10 degrees just increased lift, the plane would pitch nose down – as it would pivot around the centre of gravity.  The fact the plane (high wing designs) doesn’t do this, tells us that the extended flap is also having an effect on the forces generated by the stabaliser, which is outweighing lift/weight pivot.

So what’s going on?

The extended flap changes the shape of the wing, this changes the airflow off the wings trailing edge.  On a high wing aeroplane design like on a Cessna, this  increases the downwash striking the stabaliser.   In turn this means the stabaliser generates more downforce.

We’re now back at the balance lever diagram, the increased downforce outweighs the lift/weight couple and causes the plane to pitch nose up.

Pitching nose up causes speed to reduce, reducing lift, causing the plane to pitch down and hey presto the plane is oscillating – until it balances itself out.

Most of the above has explained high wing designs, for low wing designs like the Piper Cherokee the principles are the same but the plane will pitch nose down.   This is because in low wing designs the main wing and the stabaliser are roughly level, so now changing the shape by extending flaps causes less downwash to strike the stabaliser.   The lift/weight couple has more effect because the stabalisers ability to produce lift is reduced.

Flight Controls: Initial and Further Effects

Saturday, August 20th, 2011 | Permalink

Lesson cancelled due to rain, it started 5 minutes before my lesson was due to start and ended about 10 minutes after we called it quits on waiting for it to stop!

In the checklist of “Firsts”, in the hope we’d have got all the ground work done and be ready to hit the skies the moment it cleared:  I got to do the checks of the plane on my own, in the rain……Smart instructor!  🙂  To be honest it was a warm day and it was nice to be at the airport and walking round the plane.

What we were ment to do today was the practical of Initial and Further Effects of the flight controls.

Any action made on a planes flight controls has an initial effect, followed by a further effect if you continue that action without adding any additional control action.

So for example:

If you fly straight and level and then turn the flight control yoke to the right, the airplane will begin to “roll” to the right.  What you’re actually doing is increasing the amount of lift on the left wing by lowering its aileron (a bit like the effect of lowering the flap) while simultaneously reducing the lift on the right wing by raising its aileron.   The net effect is that you alter the torque around the planes centre of gravity and the plane rolls right…….that’s the initial effect of the action on the ailerons.

The plane is now rolling, a side effect of which is that the plane now has less lift, as a result it’s slipping out of the air nose first (because it’s heaviest).  This slipping or turning around a centre point (centre of gravity) is Yaw.   The further effect of the action of the ailerons is Yaw.

Left uncorrected, the yaw will generate more roll (because the further effect of yaw is roll), the increased roll will generate more yaw, the increased yaw will generate even more roll and on and on it goes putting the plane into a spin!

Flight Control Initial Effect Further Effect
Ailerons Roll Yaw
Rudder Yaw Roll
Elevator Pitch Airspeed

Once you make an action that takes the plane out of balance, you need an additional action to bring it back into balance or you will suffer from the further effect.   Thus when rolling the plane, you need to apply rudder to stop it yawing.

…….and that is initial and further effects of the flight controls, now all I need is blue skies to go and try it out for real.

Aircraft Ground Checklists, Taxing & Turns

Saturday, August 13th, 2011 | Permalink

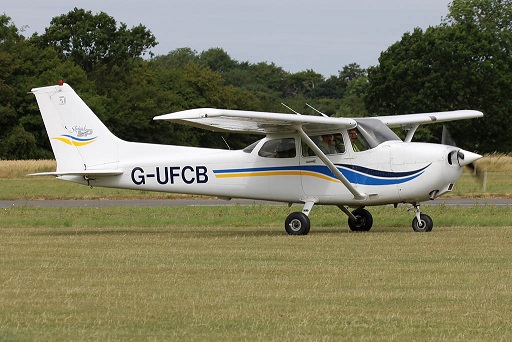
G-UFCB Cessna 172SP

G-UFCB : Cessna 172SP

Lesson 2: Pre-flight aircraft checks, aircraft start-up checklists, taxing turns and shutdown.

85 – The number of checks, before the plane is started.

39 – The number of checks, after the plane has been started, but before you can take-off.

This was a ground only lesson, going through the following areas:

  • Where the club keeps the books
  • Aircraft keys and documents
  • External check list for the aeroplane
  • Internal (Pre-start, Pre-Taxi and Pre-Take-Off) checklists
  • Taxing
  • Turns & Tight Turns
  • Shutting down the aeroplane

It’s Exercise 5 of the PPL Course book.

As you can see from the shear numbers, there’s a lot to check.

G-UFCB as we found during the checks, was in a bit of a beaten up way.   Good news from my perspective:   Instead of talking about “if it has a bald patch on the tyre…”, this plane actually had one.   Instead of trying to imagine what a plane looks like when you can’t see any of its front gear Oleo this plane had no metal visible (even when the instructor pushed on the stabliser at the back to try and lift the nose). So from a lesson perspective, a good plane – at the end of the day the plane was already scheduled in for maintenance.

My first ever taxi was never going to fantastic, but for whatever reason no matter how hard I pushed on the left rudder pedal, the plane wanted to keep going right (I guess it knew its way to the runway!) – the instructor had a go and commented on it.   However, you can turn a plane like you can turn a tank – break one side and the difference in power will cause it to turn.

We did some turns, some tight turns (using the brakes), probably got in the way of a couple of people wondering “why are they spinning a Cessna round and around…” Then taxied back to the parking area, the taxi back was a bit better.

After Landing & Shutdown procedures (Just 17 checks), the lesson was done.

Before starting this course I’d done a lot of simulator stuff, read a lot etc.  What I realised today is that what you just can’t learn without doing it, short of having a like-for-like hardware simulator, is how it all feels:   How much friction is there on the throttle, what it actually feels like to set the heading indicator etc.   What does it feel like when the rev’s drop 100RPM.

Finally, the Cessna photo is not mine, so credit to John Allan

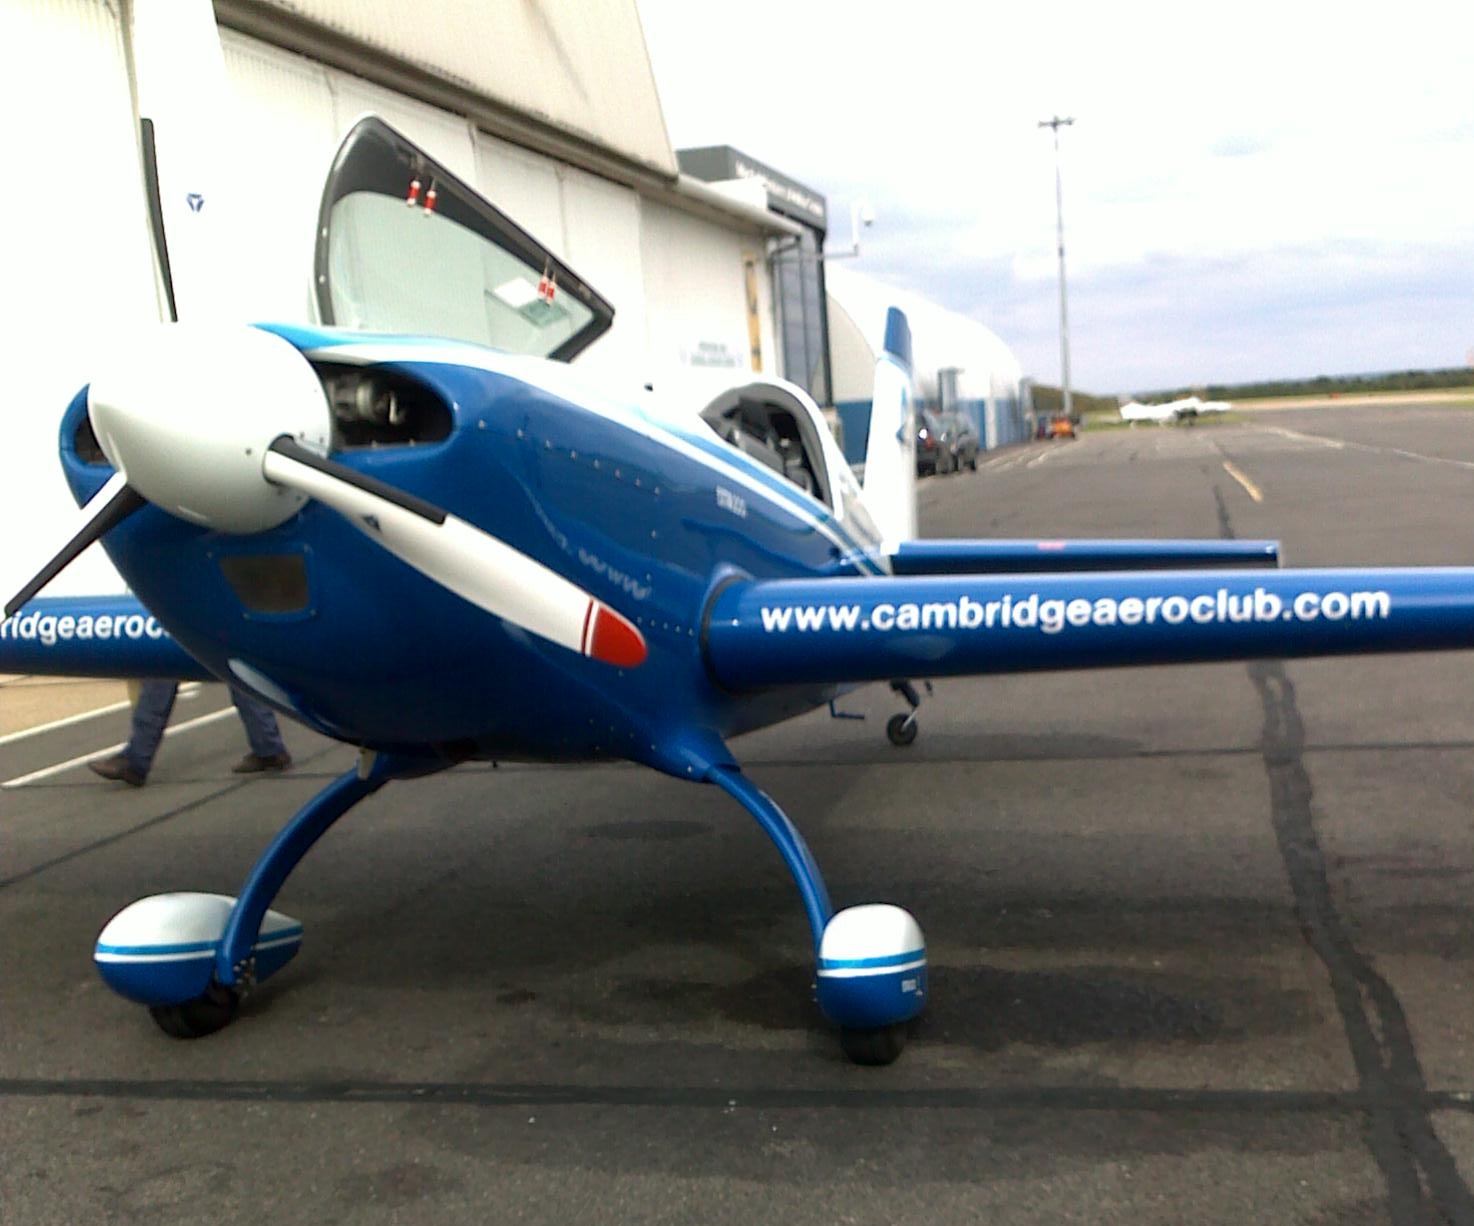
The Extra 200 that didn’t want to fly.

Sunday, August 7th, 2011 | Permalink

The Extra 200 that did not want to start its engine!First flying lesson done and with my externals lesson on the horizon, this weekend it was all lined up to be a “fun flight” in an Extra 200 – somewhere between clocking up a bit more time in the air and just having fun doing some aerobatics.

Upon arrival to the airport I’d watched the Extra 200 land, blue skies and good visibility – the gods were seemingly being kind to us today.

Pre-flight briefings done, flight suit on, headset plugged in and canopy closed we were ready to go…….

That is we were ready to go, in the 20 minutes since it had landed the Extra had decided it was less happy about going back up.   The “Oh…” from the instructor in the back seat was a give away sound of ‘Hmmm the engine hasn’t started and this is not looking promising.’

While my instructor assured me the battery was not flat, as far as the Extra was concerned it was flat – perhaps a stuck solenoid was the running theory.  My instructor made calls to various people and tried a few things to bring it back to life, but there’s a limit to what you can do before you start needing CAA aviation mechanic approvals and we were reaching that point quickly.

So sadly, it was so close but not to be (at least not today).

Re-booked and my instructor pointed out that the silver lining to this story is that in a few weeks I’ll have had more lessons under my belt, some if not all of them with him, so when I next get to try the Extra I should be in a better place and be trusted to do a bit more with it!