As you progress along the Private Pilot License (PPL) course, you will inevitably accumulate equipment: Bag, headset, flight computer etc. In coming weeks I’ll be doing some posts on the equipment that I’ve accumulated, when it became useful and what has found a permanent home in my flight bag.
For the PPL course, a torch is unlikely to feature on your ‘things to buy’ list, but if you decide to do a Night Rating, then for obvious reasons I suspect like me you’ll start looking around for which one to buy.
Beam Colour
The text books will tell you that night vision (which can take up to 30 minutes to fully develop) is best preserved with red light, while even a few seconds of bright white light can destroy it and set you back to feeling like you’re in total darkness. There’s an argument that subject to the intensity of the light, that green is better for your night vision then red, but I’m not going to get into all that – lets stick with the text book answer (the exam question does not start “discuss…”).
Torches Considered
It’s actually harder then you might imagine to find torches that put out red light, but of the ones I could find, I considered:
- Gerber Recon Task Light Torch (~£20-30)
- Coast PX20 (~£25)
- LED Lenser V2 Aviator Torch (~£30)
- LED Lenser P7.2 (~£40-60) – but would need a Red Filter kit (+£8)
- LED Lenser P7QC (~£60-80)
The Gerber Recon came pretty close to being bought, I liked the fact you had options on colour (e.g. White to check the plane as the sun goes down, red for when you’re up at 2,000ft and the electrics fail etc.). While the Coast PX20 and Lenser V2 could both be argued as capable of doing this, what I didn’t like about their approach was that they use separate ON/OFF buttons to achieve it – in the heat of the moment when you want red light, I very much suspect you’ll grab the torch, press the wrong button and be blinded in a sea of bright white light 🙁 Moments later you’ll be cursing why didn’t you buy the other torch. Oh that’s right, it was more expensive…...you mumble to yourself while burning £3/min @ 2,500ft 😐
The P7.2 also got pretty close, what lost it the sale for me was: First you’d have to buy the filters which bumps its total cost up, but more critically while this would then let you do the whole swapping of colours – without the risk of hitting the wrong button. The idea of having to swap little filter caps around in the twilight before dark, it seemed inevitable that sooner or later I’d lose the little red filter cap and would have to shell out another £10 for a setup that’s already consumed £50-70 🙁
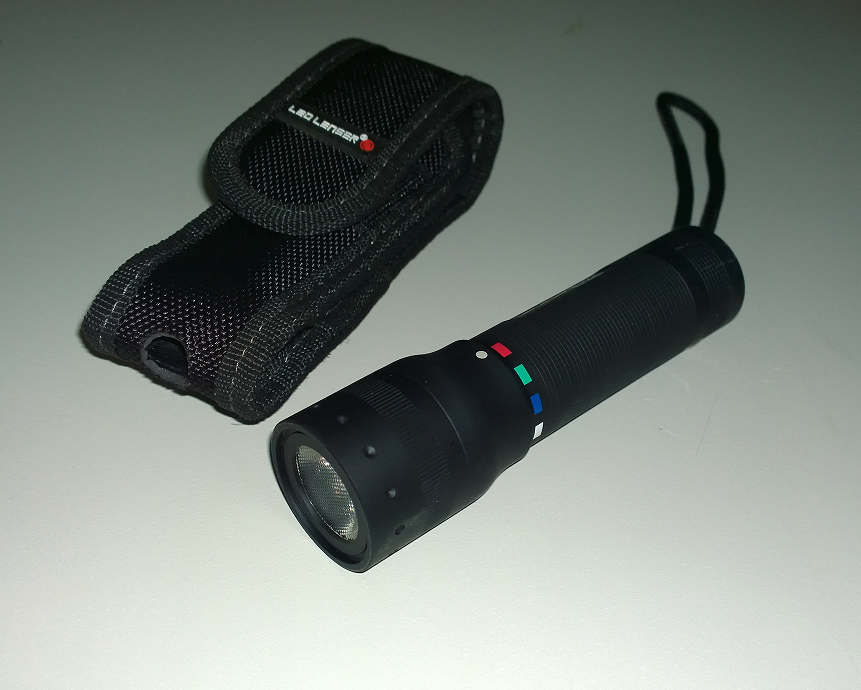
So in the end, even though at first glance the price seems pretty extreme for a torch, I went with the LED Lenser P7QC
LED Lenser P7QC
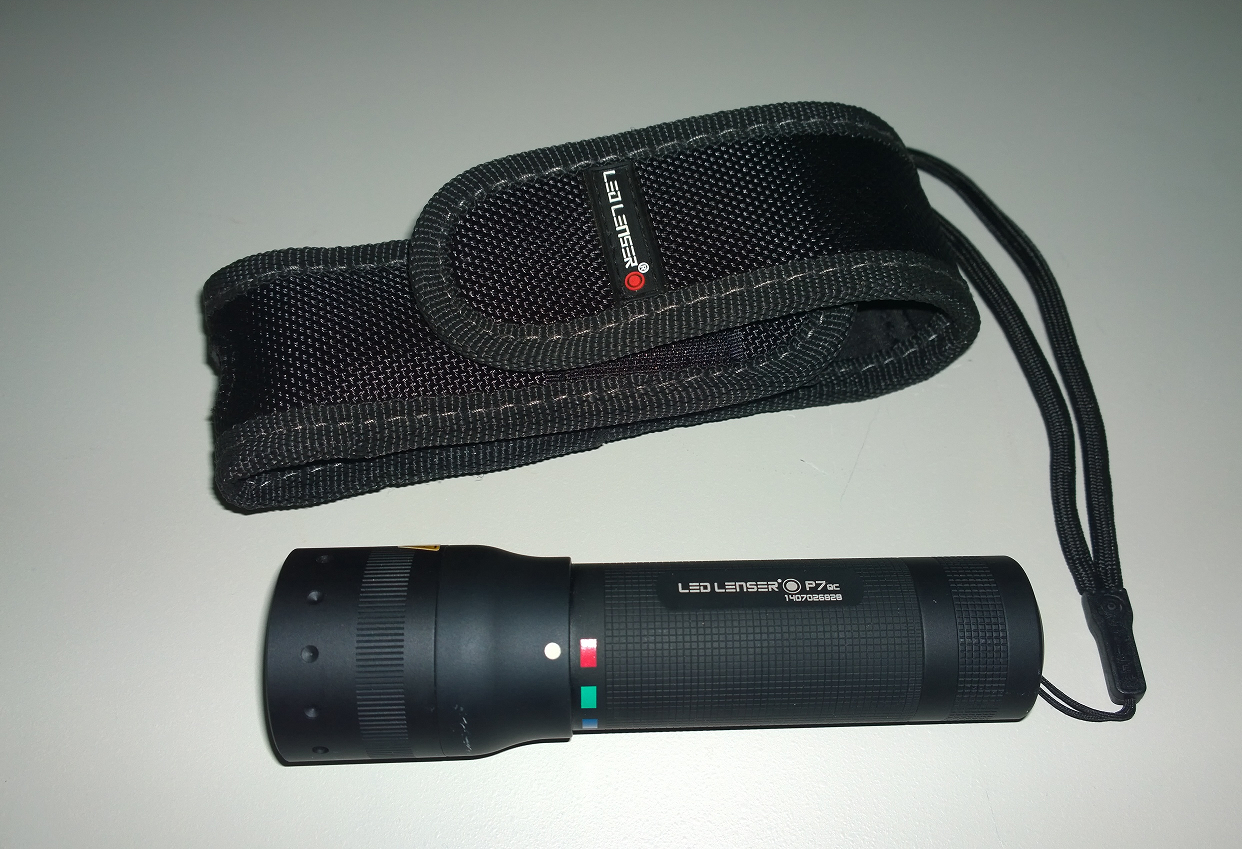
LED Lenser P7QC
As you’d expect from the price tag, the build quality is top end, aluminum with all the switches and colour rotary dial feeling engineered – nothing loose or ‘clicky’ anywhere to be found. The case it comes with is quite a snug fit, I’ll admit I didn’t like this in the moments immediately following taking it out of the box but with a bit of usage, I now think I wouldn’t have it any other way. It does ensure the torch can’t escape its case or leave you worrying it might do, which in turn has meant it goes very nicely into the flight bag.
Size wise, it’s the length of a closed fist (little finger, to thumb). This feels about the right size, one thing to consider – especially if your first thought was to look at the “keyring” type sized torches is that most of the time you won’t need a torch in the plane. You need it to check the compass in a C172 as it’s not illuminated and you might use it if the map light bulb has died etc. But you’re generally not going to be flying along holding a torch in your right hand. This means you’re going to have to put the torch somewhere between usage, but more importantly, it means you’re going to have to be able to find it again: Amongst your chart, kneeboard, headset wires, flight computer and any other paraphernalia you fly with! In the dark, potentially having just had a full electrical failure – do you really want to be rummaging around for a keyring?
It’s powered by 4x AAA batteries that go into a nice little holder device inside the handle, again someones put some thought into the design rather then just being cheap. Nothing rattles and the weight doesn’t change as a result of loosely fitting batteries etc. Batteries are included in the box, which is nice and at least saves you from the disappointment of getting a new toy and not being able to immediately have a play 🙂
Red / Greed / Blue / White : Rotary Selectable
Independently selectable switches is just asking to go wrong, the Coast PX20 has 5 white LED’s and 1 Red. So the red button is going to be quite dim, but press the wrong button and you will be assured of blinding white light by comparison. Much the same story for the Lenser Aviator.
The P7QC solves the problem of switching colours, without using filters, by using an RGB LED and controlling the LED’s colour output via a rotary dial (which is part of the head of the torch). This is a firm rotary selector, so there’s no chance it’s going to accidentally drift from Red to Green for example.
Set and forget…..
Power Modes and Flashing
So far you might be thinking that I’m a sales rep for this torch. It has a lot of good things about it, especially compared to the competition – unfortunately for reasons that I suspect come as part of wanting to appeal to a wider sales base then just night pilots of general aviation aircraft, it has a couple of things I wish it did differently.
High Power / Low Power
The torch has 3 modes of operation:
- High Power
- Low Power
- Flash (SOS)
Turning the torch on for the first time it defaults to high power (~120 lumens, colour dependent). This is my first real gripe as it’s not the default you really want for a confined cockpit. Oh don’t get me wrong, I very much think having a high power mode is beneficial, I just wish it wasn’t the default – I’d have much preferred it to toggle through: Low Power, High Power, Flash. This to me would more naturally let you find the mode that achieves an objective, rather then starting out full wack and if that’s too bright letting you turn it down 🙁
Here’s the torch on its side, set to red light and turned on at High Power:
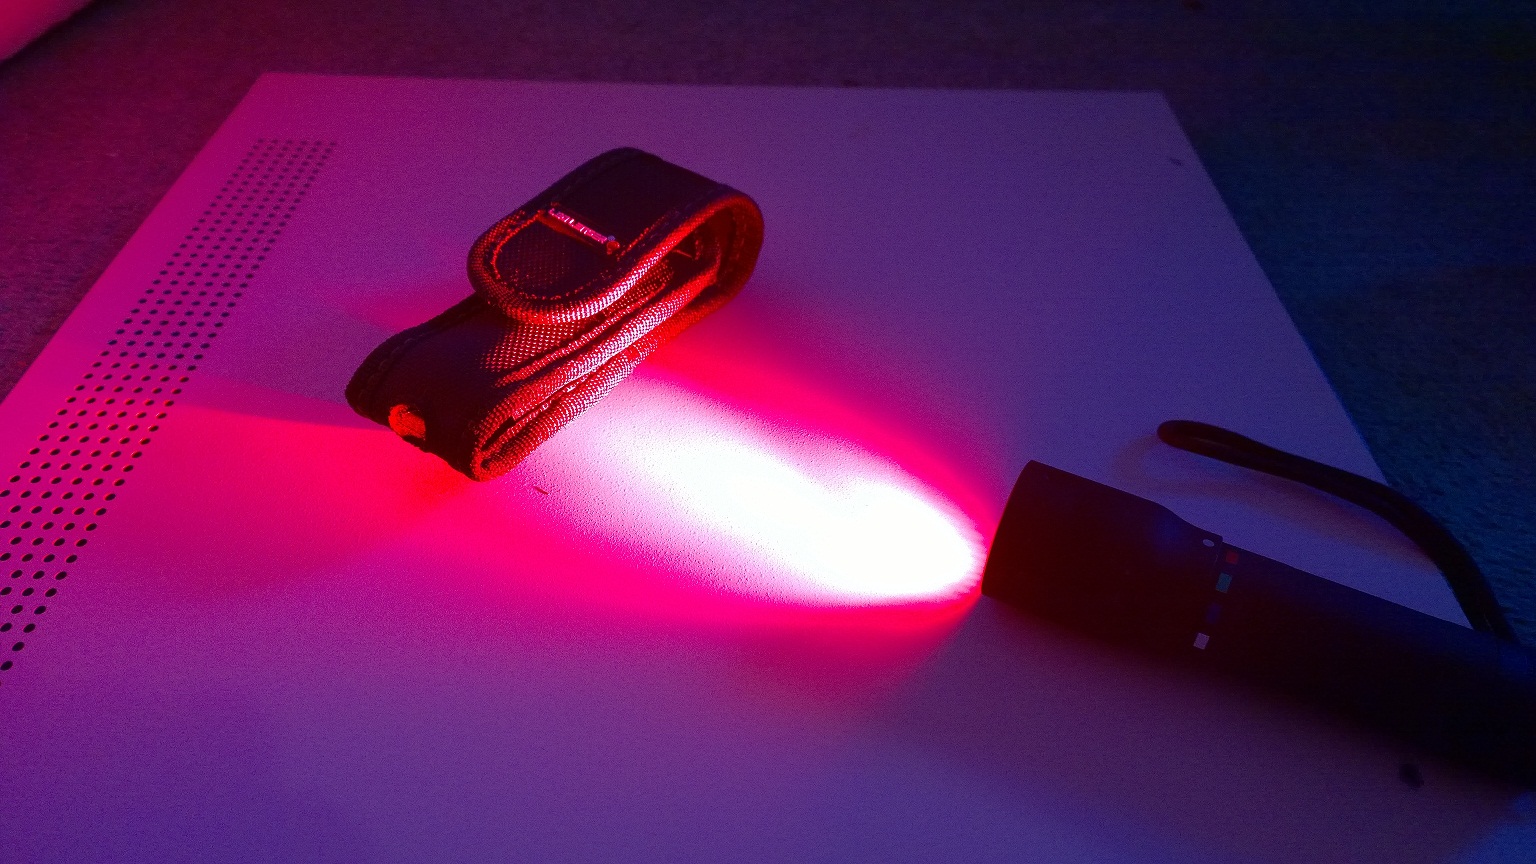
Red – High Power Mode
Now compare the strength and throw of the beam, to what it looks like in the same setup but on Low Power:
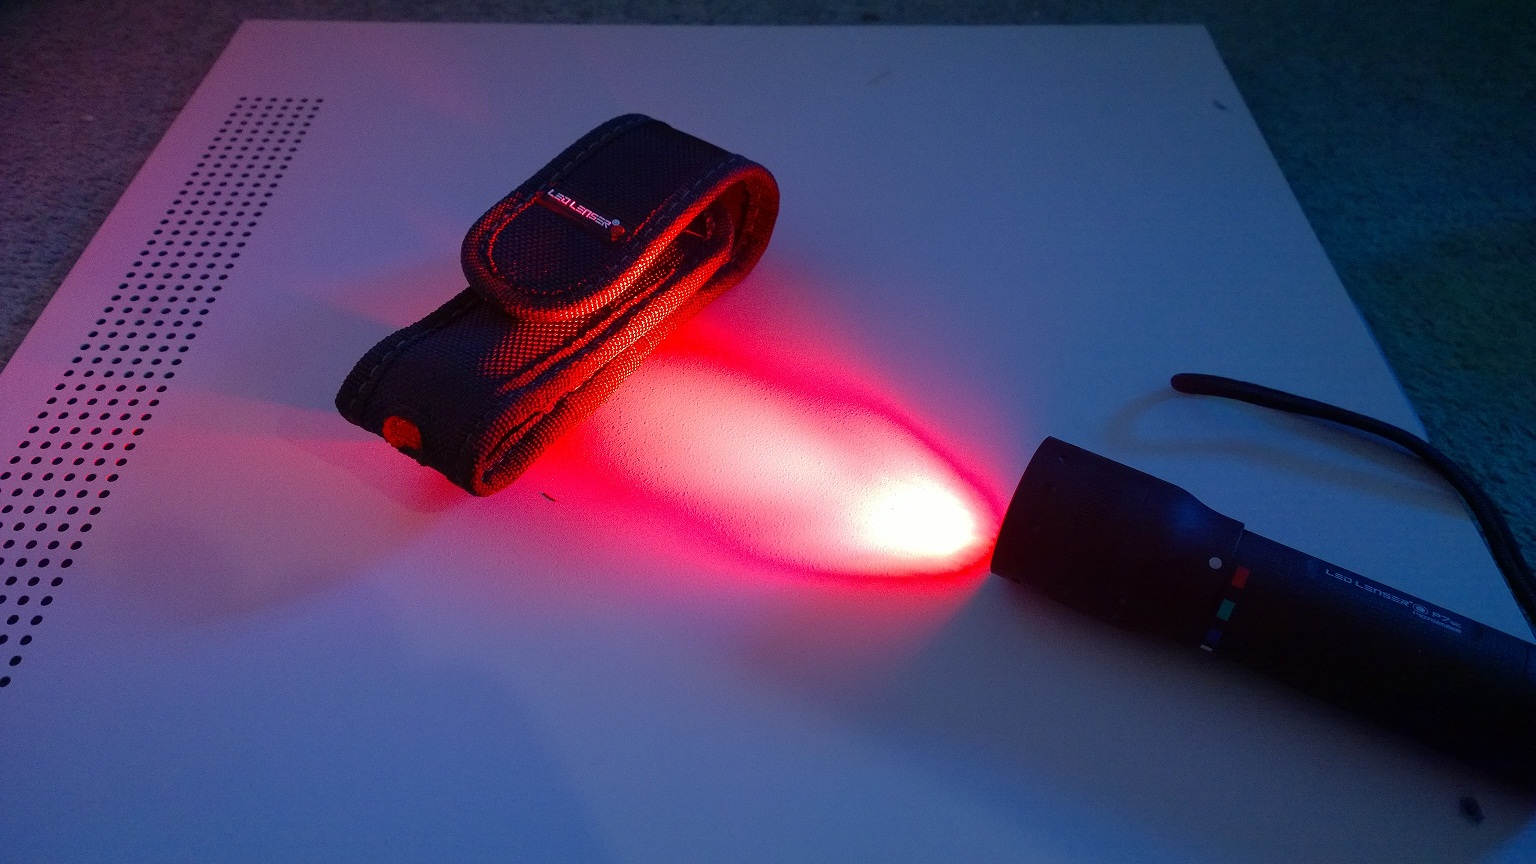
Red – Low Power
Hopefully it’s strikingly obvious which one you’d want to use for reading a chart or compass about a foot in front of you! I’ve purposely shown the beam strengths like this because how far the torch can throw a beam of light might be a requirement for someone looking to do hiking/camping at night, but it really isn’t a major concern for flying.
This “how bright can we make it” issue however is true of almost all torches you’ll find. The selling point is all about how bright they are or how far they can throw a beam of light, rather then how dim they go 🙁
Having flown a simulated electrical failure with the LED Lenser P7QC, I found the low power (manual says its ~40 lumens) was actually pretty much perfect for what you want. On low power you can chuck the torch on your seat and it very nicely lights up the Airspeed Indicator, Artificial Horizon, RPM etc. but at the same time. The beam isn’t blinding to the right seat passenger and while it still means you can just about see the flaps lever of a C172, it’s not flood lit, so you’re not inadvertently distracted. I could have lived with it being a touch dimmer actually, but when it came to landing the plane in simulated electrical failure, I was very glad of the fact I didn’t need to hold the torch in one hand to see the airspeed indicator and could keep my left hand free to fly the plane and right hand on the throttle all the way down to landing. A torch forcing you to have only intermittent throttle control with no flaps/electrics I feel would be bordering unsafe, because with no flaps the stall speed is increased & you’ll be trying to fly a faster airspeed on approach – you want good airspeed monitoring all the way down and to be able to fly the plane, rather then starting to let it fly you because you’ve ran out of hands 😐
I just wish low power was the default mode.
Flashing
When you need a torch to flash, you’re having a very different sort of emergency or more to the point you’ve had the emergency, are lucky enough to have survived it and now just want to go home 🙂 So for all those times when you want to work with a torch (i.e. read a chart), rather then hoping it will do something for you (attract attention/rescue), you won’t want the thing to be flashing!
They could therefore have dropped this feature entirely for me. I can accept that if you’re incredibly unlucky you might find yourself in a situation where you want your only torch to maximize it’s attention grabbing capabilities – but it’s going to be a pretty rare case (or I’d hope it is).
The torch toggles its modes if turned OFF/ON within 2 seconds of turning off, so if you want Low Power you turn the torch ON, then OFF, then reasonably quickly (or very quickly) back ON. Great, unless you accidentally go past it and then you’re into Flash 🙁 It won’t return to default unless left OFF for 5 seconds, so if you turn it off low power accidentally, more then likely you’ll have to cycle through flash.
If they had to have a flashing mode, I just wish it was accessed through a much harder to activate process rather than as part of toggling through the modes via the ON/OFF switch.
Conclusion
I bought this torch after my 2nd Night Rating lesson, prior to buying it I’d borrowed torches off instructors – which was getting a bit tedious.
It’s heaviest usage to date has come in my second aircraft failures/emergency lesson as I’ve mentioned above, which simulates internal lighting failures, full electrical failures etc. If I wanted to be convinced it was a good torch to buy, this lesson alone convinced me. It’s low power is not so bright that it will illuminate the world, but bright enough that you get a nice red hue across all the important instruments, while the torch can just sit on the seat, allowing you to keep flying the plane almost entirely as normal.
LED Lenser P7QC
The size and weight are both excellent, making it easy to find amongst charts and kneeboards.
Being able to ‘set and forget’ the light beam colour and have no risk of pressing the wrong button mid-flight was a major feature for me. Especially as the solution they use doesn’t involve hot-swapping filters.
High Power mode is way too bright for usage in the cockpit, but good for externals checks and/or finding the plane keys should you drop them 🙂
Low Power mode is near perfect, perhaps a little dimmer would have been nice. It’s a bit of a shame though that this is 2 clicks away to access rather then being the default mode – it’s absolutely fine for when the internal lights fail, but it’s a little bit tedious when you just want to check the Heading Indicator & Compass are aligned.
Flashing mode, it isn’t really needed for 99.9% of GA flying – but perhaps should you ever be unfortunate enough to fall into the 0.1% you’ll be thankful it was there and all the times you’d accidentally clicked past low power mode and on to flash will be forgiven (A lot like wearing a life jacket over water, it’d be more comfortable if you didn’t have it, but if have to land on water you’ll quickly forget about creature comforts 🙂 ).
So given it’s around the top end of the price range for what you can spend on a torch on most flying websites etc. (I’m sure there are tactical super torches that have bells and whistles that cost much more). Am I happy with it? / Would I buy it again? : Yes, it’s found a home in my flight bag and I’m not looking to replace it at all, the cost is now lost in the noise of an hours flying etc.
Recommend it to a friend/learning to fly (at night) etc. Absolutely.