Night Rating: New Licence Arrives

March 16th, 2015 by PHC | Permalink

Night Rating Delivery

Night Rating Delivery

Training complete, application and paperwork filled in and credit card details provided.   Nothing left to do but wait around for a newly updated licence from the CAA.

Your mileage will probably vary, but it took mine about 4 weeks from sending off the application to the date the new licence arriving.   Please note, I say ‘new licence’ only because you don’t send off your old licence, it’s not a replacement, you keep your existing PPL licence etc. and when your night rating is added on to your licence you’ll be sent new licence paperwork.

I was a bit worried about how this would be handled because it could have become a real headache if I had to send my licence off for 4 weeks and then not have a licence to be able to prove I was eligible to rent an aircraft etc.   but not a problem this way so good times 🙂

So I’m now legal to go flying at night all on my own!   Great stuff.

Have I used it yet?   Nope and if you’re sharp eyed you’ll notice this post is about a month behind the time of actual events 🙁    A night rating just in time for summer then, what’s the point you might ask?   Well I might not make masses of use of it in months to come, but when October/November rolls around, there’s no risk of getting caught out or having to rush back as 4pm rolls around.   It’ll just provide some options, I love to fly farm strips so I’m not hoping to use this to go night flying into farms……..but it will help keep me legal coming back from some farm an hours flight away from Cambridge etc.

Night Rating: Part 5 (Completing Solos)

March 4th, 2015 by PHC | Permalink

The requirements for a night rating include:  “5 full stop solo landings”.   With everything else signed off on my training, this lesson was aimed at just completing this requirement – with 1 solo night full stop already completed, 4 to go tonight.

Another Instructor, but a special one

5 hours of night flying will have seen me fly with 4 different instructors, they’ve all been great to fly with but this lesson was a bit special because I’d be flying with the instructor who was the first to ever let me take-off on my own (I didn’t say solo, just the first time I was ever trusted to open the throttle and rotate a Cessna 172 and climb away for myself and I remember that first take off fondly – but the landings did take longer to master 🙂 ).   That was all the way back in September 2011, time sure fly’s when you’re errrm, flying….

I never flew with that instructor again, tonight we’d probably fly one circuit, but all the same it would be a pleasure to do a circuit and show how a student from years ago had progressed.

Quick Briefing

Nothing much to say, just a review of my training records to make sure I’d get it all signed off on this lesson.   That the intent was we’d do 1 circuit, if that was good, he’d hop out and I could crack on and complete my requirements for a night rating etc.   Nice simple lesson for all involved hopefully.

Duel Check Circuit

My memories are of a all nothing to write home about circuit, take off, turn, downwind, checklists complete, radio call for final and land.   Nothing to it.

Clearly it was ok because he asked to vacate the runway, he could go get a cup of coffee and I could do a spot of night flying on my own.   The winds were calm and the sky was clear of could, a really quite beautiful night to go flying.

Solo Circuits:   Arrrgh Just Let me do my circuits!!!

After a fairly quick taxi and ATC getting me back into the air with no delay the first circuit was smooth and I was just settling in for a  nice ~30 minutes of going round in circles.

Just turning onto final approach for my second circuit:

Go Around, Go Around, G-HERC, Confirm Go Around.

Power back on and a radio call to confirm I was going around, that’d just stuffed ten minutes of flight time (in cash terms £30 wasted).   The Air Ambulance had scrambled and as you might expect they get priority to depart the airport – you can’t argue, but did someone have to have an accident right when I was about to complete my night rating?  😛

I was then asked to extend before turning crosswind for 2 miles to give the air ambulance time to clear the airport.  Ok, but this would mean having to find my way back into the circuit in a night sky of ground lighting soon to become unfamiliar.   Still not exactly rocket science, just another good way to burn money/fuel without achieving anything 🙁

Finally second circuit out of the way, really no drama my night circuits now were as consistently good as if I was flying in the day.

Circuit 3, all going great until getting onto the downwind leg when in a rare moment for ATC essentially I was stitched up for other traffic.

G-HERC, perform a right Orbit for separation.

No worries, I love to fly the odd orbit in the circuit, keeps you in good practice at holding a height while flying a constant 30 degree bank.   Except that, didn’t the preceeding radio call say the guy was 8 miles out?   That’s a lot of ground to cover in the time it’s going to take me to go 360 degrees @ 100 miles an hour.

G-HERC continue Orbiting until further notice.

Round and round and round and round……..I lost count how many times I went round in circles.  Once for fun, twice for perfection, but then it gets a bit boring.   I was starting to get concerned that at this rate I’d actually run out of time to complete the circuits in the lesson slot – but equally was pretty determined I was getting this rating done tonight come what may.

Finally some fast jet landed and I was cleared to stop circling, for another tick in a box landing that I think everyone in hindsight could safely say I could have done easily twice over without interrupting the plane I was delayed for.   Still, you win some, you lose some, don’t worry too much about it.   Just one more circuit to go 🙂

Nice Final Circuit

Finally the distractions had passed and I got a nice easy circuit with no trickery.

Back on the ground it was just a matter of taxing and parking up (amazingly my parking is now infinitely better then it was when I was a student and missed the wheel slabs, every time!).

All done except the Paperwork and Money

Job done, my night rating training was complete, just a matter of coming in during the week to get all the forms filled in and signed.

There’s quite a lot of paperwork, a surprising amount actually:

  • The Application Form is ~7 pages, you fill in a bunch of boxes, the instructors sign off on a bunch of boxes and hours flown etc.
  • You need a Certified (by the Chief Flying Instructor) copy of your Passport, to prove you’re applying for who you say you are – very strange.
  • A Certified copy of your Medical (i.e. Class 2), again by the Chief Flying Instructor – not sure why you need a certified copy of your passport if you’ve got this, but eh ok…
  • Your Logbook needs to be signed off and will need to be sent away.

Perhaps that list didn’t seem strange to you?   Well just consider this, you can only apply to the authority which holds your medical records.   So they have my license number, they have my medical record number, they know the ratings I already have and they know my medical is valid because they hold the records for it!   Really quite strange, but it is what it is and you just need to follow the process rather then try to fight/disagree with it.

My logbook was interesting, it had last been filled in with pen when I got my PPL.  Since then I’d clocked up about ~40 more hours/flights, all in pencil, so another hour or so of going over all of this with pen again!   Still I have a mistake free logbook record as a result of this effort of pencil first 🙂

Don’t forget the money, at the time of writing it’s £89 + £6 to have your new rating and log book returned by secure courier (I think you’d be mad to have your log book returned any other way!).

Then it’s just a matter of waiting……

Night Rating: Part 4 (Emergencies & First Solo)

February 28th, 2015 by PHC | Permalink

G-UFCB Cessna 172SP

G-UFCB : Cessna 172SP

When I booked this lesson I knew it would be with an instructor I’d never flown with before.  No matter how many times you do it, this always fills you with reservations:  Will I just magically forget how to fly and look ridiculous?   Will they have different opinions on procedures/landing technique etc.  Even with a license in your bag, these thoughts don’t seem to go away – in some ways perhaps a license can make them worse, as with driving I’m sure if you spend enough time away from “the proper techniques” you develop bad/personal habits.

First Impressions

It’s human to develop opinions about people on first impressions, you shouldn’t but you do.

On meeting, the opening volley of conversation didn’t leave me overly thrilled about going flying.    A sense of almost “I’ll tell you what we’ll be doing – you clearly have no idea” in the air.   Still, we might always have first impressions but I’ve had them about all the instructors I’ve gone flying with and they’re often wrong.  So let’s skip past this front cover and see if the first pages make the book worth reading 🙂

Briefing

Objective was to finish off my emergencies, left on the cards:

  • One straight forward normal night circuit
  • Radio Failure
  • Internal Lighting Failure
  • Total Electrical Failure

If all that went well the instructor said he might jump out and let me go solo.   This book is getting better already!

Taxi and Take-Off

A few ‘instructor in the plane’ jitters, managed to skip over turning the Nav lights on, started taxing with the flaps down 🙁   See this stuff was never drilled into me in training:   Re-set Power to 1,200 RPM after everything, absolutely and utterly drilled into me!!

Throttle Open, the Cessna charges down the runway into the dark sky.

I know a mile of runway is ridiculously more then a Cessna 172SP needs, you could take off and land on it about 3 times before running out.   Honestly though, it never gets old to line-up on the centre line, a mile of asphalt ahead of you and to then open up the throttle, in control of an aeroplane!

Let there be Music!?!?

My log book says I’ve done literally hundreds of take-offs, sure this is about take-off number 15 in the dark, but short of an engine failure the show is pretty much routine for me now.   Well it was until about 300ft off the ground a voice over the intercom says “Hey how about some music?”

Errrrrrrm, dunno, yes I guess – my brain just couldn’t quite grasp the question.

A second later, there was music coming through my headset!   Sure it wasn’t the latest chart topper but it was a complete first.   Not only was I a bit stunned that hey I’m supposed to be training for a night rating here, shouldn’t I be trying to soak up every second of wisdom and good instruction??   Second, we’re 300ft off the ground, not cruising along with with a basic service on a constant heading for 20 nautical miles.   That being all said, it made me laugh and began to shatter my first impressions.

The music stayed on for most of the downwind leg, I got a little brief about the ADF and its other uses (i.e. it’s essentially a Long Wave radio receiver) 😛

As I turned base the music went off and I could focus on landing the plane, which actually came together really quite nicely and I touched down just a few feet past the numbers all very much like it was intended to happen.

Flaps up, power back on and away we go.

Radio Failure

The instructor told the tower we wanted to simulate a radio failure, which they accepted.   Now the name of the game is to look for a green constant light coming from the tower, indicating it’s ok to land at this aerodrome.

My first thought was “How big/bright is this green light supposed to be?”  I’ve been on a ‘Tower Tour’ at Cambridge which if you get a chance is worth doing and been up close to one of these green spot lamps – but even so that doesn’t really give you a clue as to what it looks like in the dead of night with a major city in the background.

Bat Signal

Proper Signalling System

You want to imagine a Green light signal, like the Bat Signal projecting into the sky to give a very reassuring “Yes, this signal is for you…..come and land here”.   Sadly it’s nothing of the sort, a green dot might be doing it an injustice but it’s not the biggest light in the world to try and pick out and with half of Cambridge in the background, plus a Green aerodrome beacon light flashing away – it’s hard to tell one green light from another.   You can’t put a price on safety, but if you could, it’s less then the cost of a massive spot lamp with “LAND HERE” taped across the beam apparently 🙂

 Still the goal of this circuit was all about what I’ve said above, familirisation – what would the light signals look like?   It’d be a nightmare to try and spot them if you’d never seen what you were looking for and had just read the text books.   I’d obviously be looking for a bat sign and that would have got me nowhere 😉

Interestingly the tower still gives a radio call, but prefixes that the call is blind to our aircraft.  Which again was interesting learning of what to expect on returning to an aerodrome with a failed radio.

One thing to note about night flying, the only airfields you can typically do it from are places like Cambridge, Norwich etc. big aerodromes that are licensed and have all the kit etc.  but equally these are the same places where the circuit traffic tends to be quite high and returning to one without a radio and thus without agreed join instructions etc. is something done under considerable caution and care.

My landings were on form tonight and it was another pretty much as good as I can do landing.   So good it was now drawing complements from my instructor which is always nice – because god knows in my training days I’ve slammed my fair share of Cessnas into the tarmac hard!  (Crosswinds used to be my Nemesis).

Internal Lighting Failure

It’s a requirement of a night approved aircraft to have internal lighting for the use of being able to read airspeeds etc.  which is great, except when you follow the schematics through you’ll find that it all comes off 1 battery through a single circuit breaker.   So if one light shorts, you’ll probably lose the lot!

The cockpit of a Cessna, even with night vision developed is a dark place and you can pretty much forget being able to read the airspeed.   That’s why you remembered to bring a torch and tested the batteries in your pre-flight checks right?  🙂

With torch found, my fear of its default bright mode was realised, but another quick click and it dropped to a low power red beam which actually lit the cockpit in a very nice haze of red.   God knows what it looked like from the ground! 😉

C172 under Red Illumination

C172 under Red Illumination

However, having all the instruments lit in a glow of red light with the torch essentially just dumped on the seat did work particularly well.  No faffing about trying to fly the plane with one hand and control throttle, trim and torch with the other.

It resulted in essentially no noticeable difference in my flying whatsoever and the final approach was flown as good as any with internal lighting so I found myself really settling into this lesson.  It couldn’t have been going much better.

Total Electrical Failure

Finally a simulated total electrical failure, so no internal lights, no radio and no flaps (and a note from the instructor that the avionics would be gone so we wouldn’t even be talking to each other over the headsets at least).  I suppose a sensible course of action would be to land the plane then! 🙂

If you read back through this blog to my training in the circuit, my flapless landings were my best.   I could land with the flaps up all day long, it was  with them down that it took what felt like an age to become slick.

The torch continued to perform brilliantly, really liked the red illumination of all the instruments, really made flying the plane easy.

Lack of a landing light really messes with the depth perception of the runway so the touch down was  a bit harder then I’d have liked but the instructor seemed very happy with it all.

Fancy doing one on your own then?

First Night Solo: Circuit

We pulled off the runway and the instructor jumped out with the usual final words of wisdom and checks that I’m really happy in myself and he’s not just pushing me into a flight I don’t want to do etc.  (It might sound daft, but accidents have happened because students have gone solo when not comfortable in their own minds about doing it).

I always forget to get the airfield information again after the instructor jumps out, a ‘large airport’ problem that Cambridge has an ATIS.  Thankfully Air Traffic Control weren’t to grumpy at me and just gave me the QFE and away we go, thanks to them as always 🙂

Throttle open and away into the dark night sky – all on my own!

Your first solo is a special moment, I can remember when I did mine getting to 200ft up and thinking “well I have to land it on my own now…”.   Many hours have gone by since and I’m a better pilot now (I have paperwork to prove it! 🙂 ), so I found this take off and turn on to the Crosswind leg actually really quite a peaceful experience, a sort of nice walk in the park flight.   Very different to the “have I checked everything” / actively thinking hard first day light solo.  Muscle memory taking over for much of the effort of flying the plane.

Another good touch down, my landings really were on form today.

Vacate and Taxi to Hanger

As the temperature was dropping, the Cessna’s were clearly getting put away for the night in the warm of Hanger 2.   Air Traffic Control gave me a Taxi clearance to the hanger, which I could just about remember how to follow – 99% of the time you taxi to/from the grass parking, but Cambridge Airport has a lot of other places you can go and a lot of other holding points and taxi ways available.

If in doubt : SHOUT!

You won’t get any points for guessing when taxing around an airport, you’ll get even less points if you go somewhere you’re not cleared to go!   At best you’ll start to annoy ATC, at worst you’ll either begin to endanger other users or end up hitting something.  Sure the Cessna 172 was designed many years ago, but they’re still far from cheap toys to go pranging into a fuel bowser or even worse another expensive toy you should never have been near if you’d gone the right way.

Although I knew in my mind where I was going, I felt there was no harm to just double check with ATC I was about to turn left at the correct point, after all the airport was quiet – if I’d hit something the fact ATC weren’t busy etc. and could have given me clear advice would have been another black mark in the accident report of signs of poor airmanship.   The worst I’ll have got for asking is some remark in the tower about how ‘students’ don’t know the airport – eh I can live with that, but I think the ATC guys/gals at Cambridge are above that standard and were probably happy to help and have something to do.

Once parked up outside the hanger and the engine off, just the matter of helping out pushing the planes into the warmth.   Always good fun, if you don’t like pushing aircraft around when the meter isn’t running, learning to fly isn’t for you 😉

Debrief and What’s left?

My instructor was full of praise for my flying, always nice, particularly full of praise on my landings.  I’m sure they just say that to make you come back and fly some more 😛

That said the lack of any negative points or things to brush up on was very satisfying.

With all my emergencies and duel hours required clocked up, all I have left to do is complete my 5 solo full stop landings – so next lesson should be a simple check ride with an instructor, they’ll hop out and I can crack on and complete 4 solo full stops.  Job done.

Night Rating: Part 3 (Navigation)

January 12th, 2015 by PHC | Permalink

I’d assumed this would be a pre-defined route (as per PPL Dual Nav’s), but it turns out that the night dual nav. is done by letting the student plan the route.  Usual restrictions allowing, you can go wherever you like as long as it meets the rating requirements of being a 1 hour flight and greater than 27nm (50km).   I’ve no idea how you fly for 1 hour and not cover 27nm, but I assume the distance criteria is there for a good reason – perhaps to push you out of visual distance of your home airport?

Briefing / Route

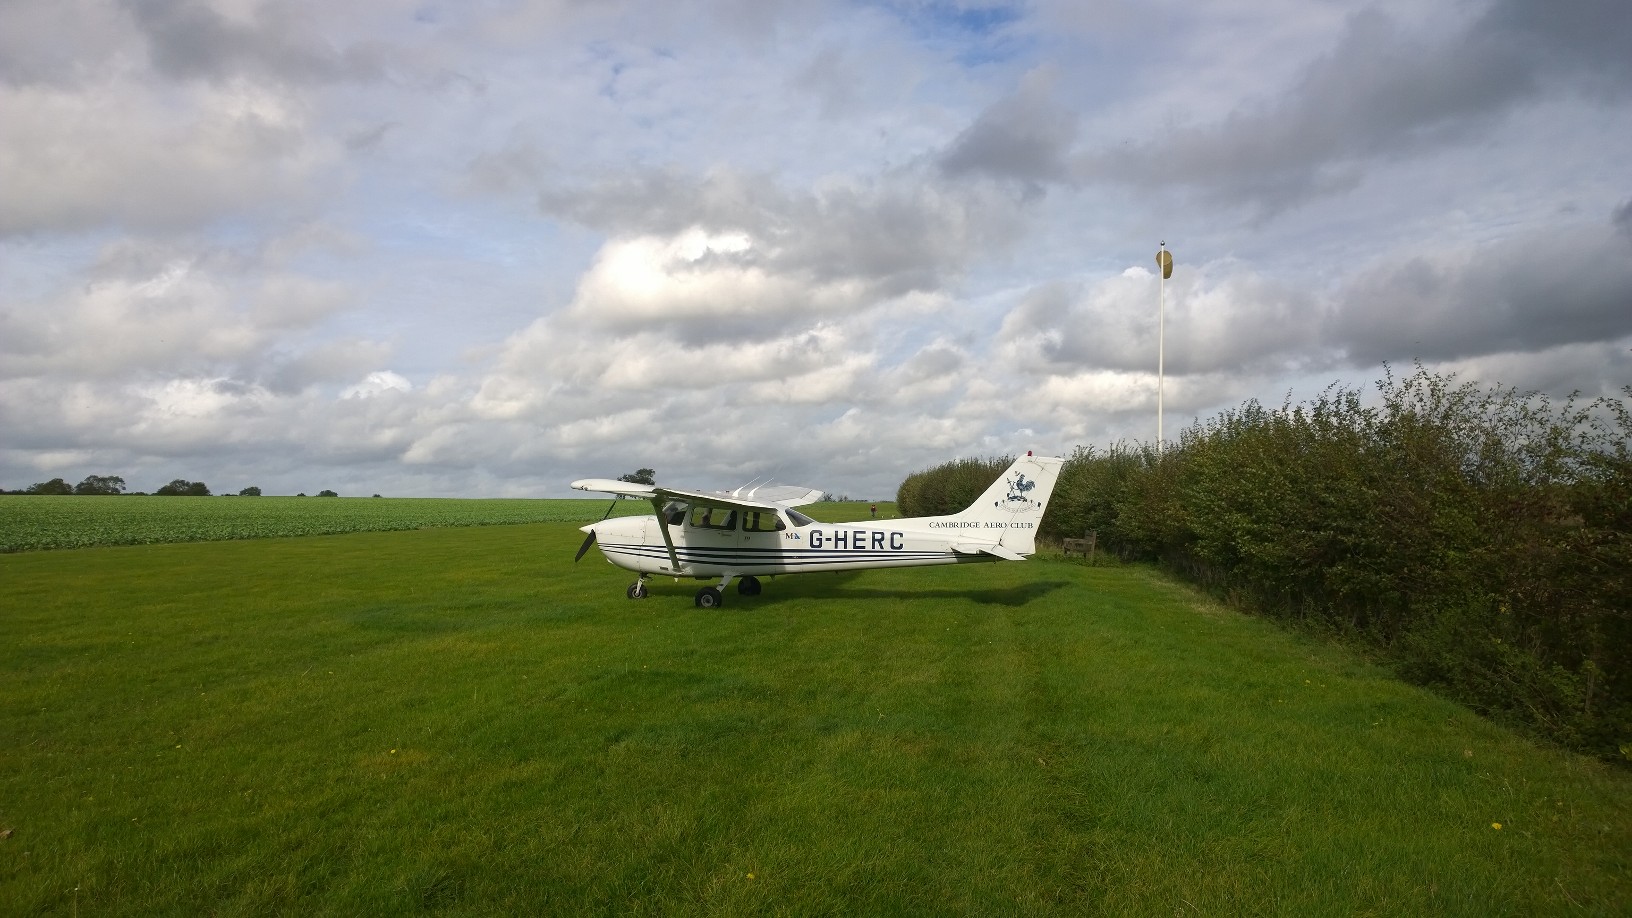
Turning up to the aero club on an amazingly clear sky evening, my wife asked what I thought the chances of going flying were?   100% I replied confidently, not a cloud in the sky, not a gust of wind in the air.

Time to be reminded that there is more that can stop you flying then the weather!

My instructor came out, doing his best to hold back from coughing.   It doesn’t take an Air Medical Examiner to know when someone is either about to come down with a cold, or is recovering from one – oh dear, this could end more rapidly then I’d expected and for reasons I’d not even considered.

I just had to put the wind calculations into my flight plan, so while I did that the instructor went to get a hot drink and assess how he was feeling.   While doing this a friend turned up and asked what I was up to and what route I had planned.
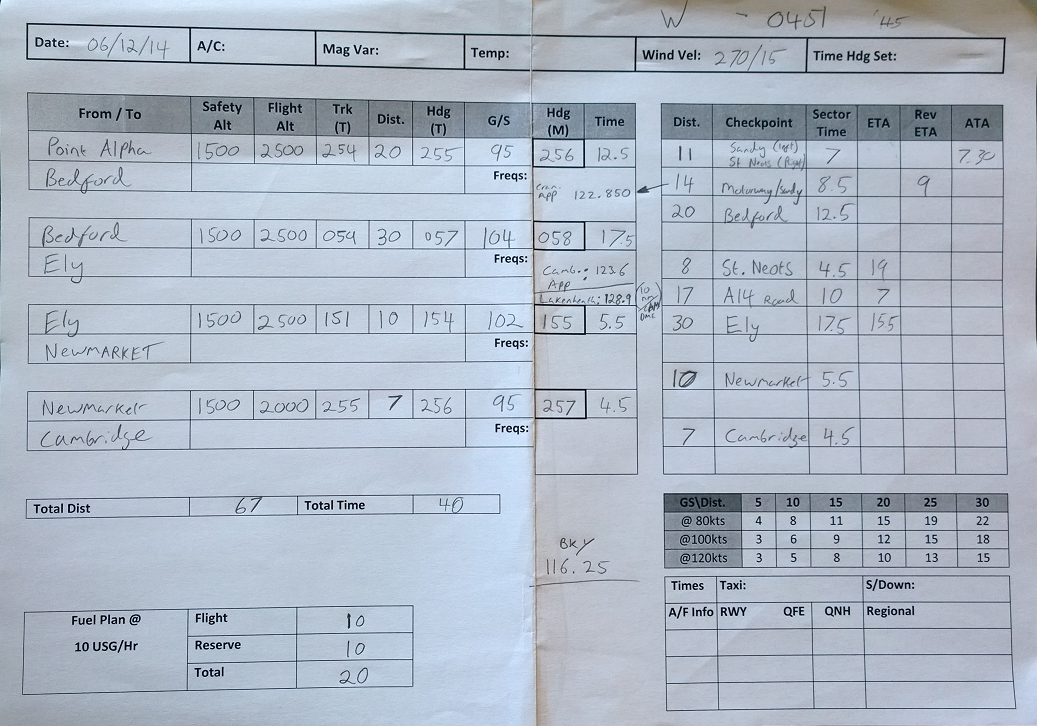
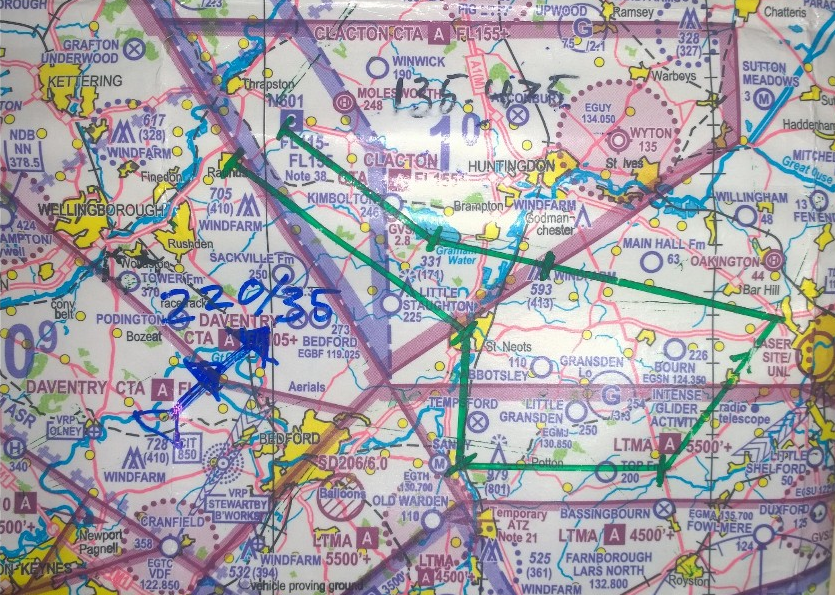
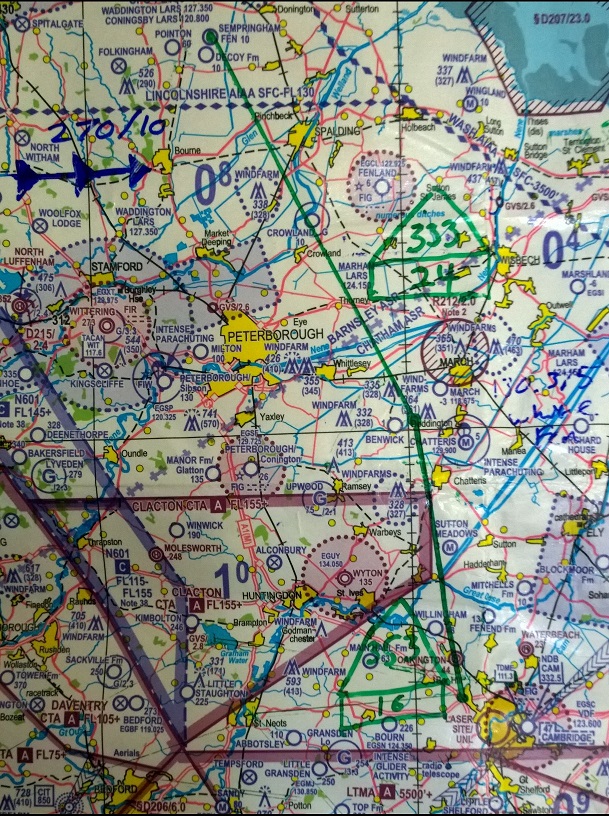
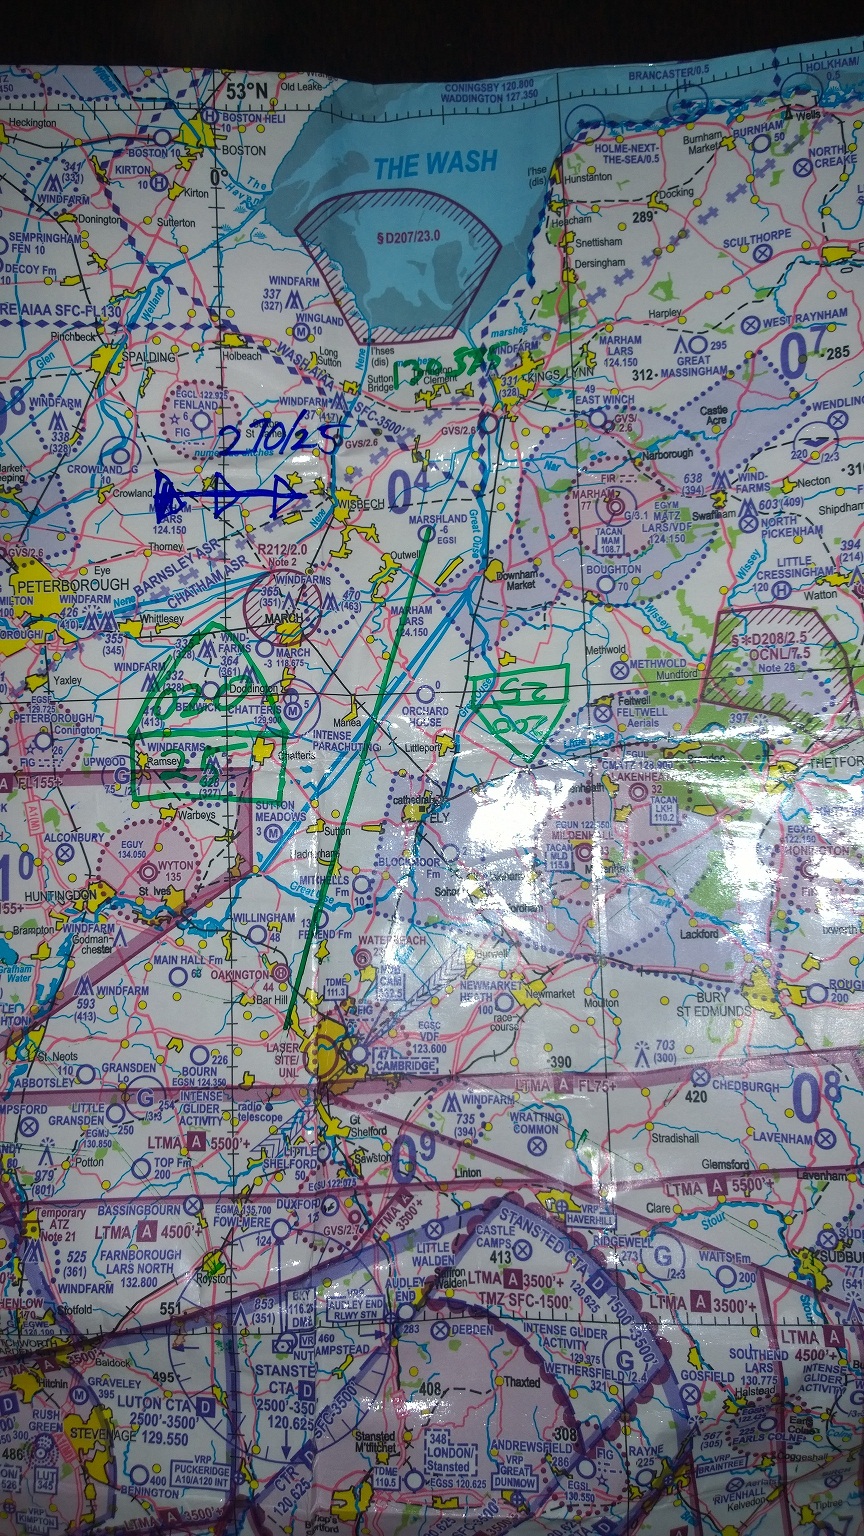
  • Fly down to Bedford
  • Turn around and fly North East to Ely, turning over the Cathedral
  • Back down to fly overhead Newmarket
  • Returning back to Cambridge.

Already having a night rating he was just playing with ideas of where to go/what to do himself.  Going down to Cranfield was out because they had a runway lighting problem.

Night Rating Chart Route

Night Rating Route

On my instructors return I awaited that slightly awkward but understandable moment, where an instructor brings themselves  round to finding the right words to cancel the lesson.  Instead a discussion started on what the objective of the lesson was and where I wanted to go.

He felt confident he could cope with a gentle Navigation flight, so we were still on (just!).

A quick cross-check of the routes headings & math and it was off the check the plane.

Deviation results in Disorentation

I’ve flown out of runway 23 hundreds of times, normally going up to around 1,500ft straight ahead and then beginning a turning climb.   I was already a little anxious in my mind about what Point Alpha (A14/M11 junction) would look like at night and if I’d recognize it.  So when the instruction came to continue to fly straight ahead until 2,000ft (and thus increasing my forward/horizontal distance).   This really threw my orientation.

I made a half hearted gradual turn, then for no hard/good reason decided that that was more then enough turning and started to look for the junction.  Maybe it was somewhere out to the left?   Nothing there that looks sensible.   Ahead?  Nope.  Perhaps we’ve flown past it and it’s on the right?  Maybe not 🙁

I’d only been in the air a few minutes and already I was feeling lost, with none of my usual visual references to fall back on and at night the other good fixes like wind farms and railways can’t be seen.   It’s easy to write down good sensible flying advice in hindsight and it seems obvious to read such advice back, but it’s amazing how easy the brain gets fixed on a problem and won’t let it go.   It felt a bit stupid, but it was time to admit I was struggling.

What Runway did we take off on?…………Where is Point Alpha relative to that? ………..and what heading are we flying now?

Simple things!   Really simple questions from the instructor and my starry night haze of confusion cleared away.  We took off on Runway 23 (so heading 230 degrees), Point Alpha is north from there, yet we were heading 280-290 degrees.   Clearly not north!   So the road I was trying mentally very hard to “fit the map” was not the A14 but was in fact the M11, perhaps if we turned right and headed north we’d fine the A14/M11 junction.   What a nightmare, I can fly a plane really!!!

Embarrassing first night nav error out of the way and with Point Alpha now visually out of the window (I was worried it wouldn’t be that obvious – turns out it’s pretty blatant!), now I could settle down and just crack on flying the plane.
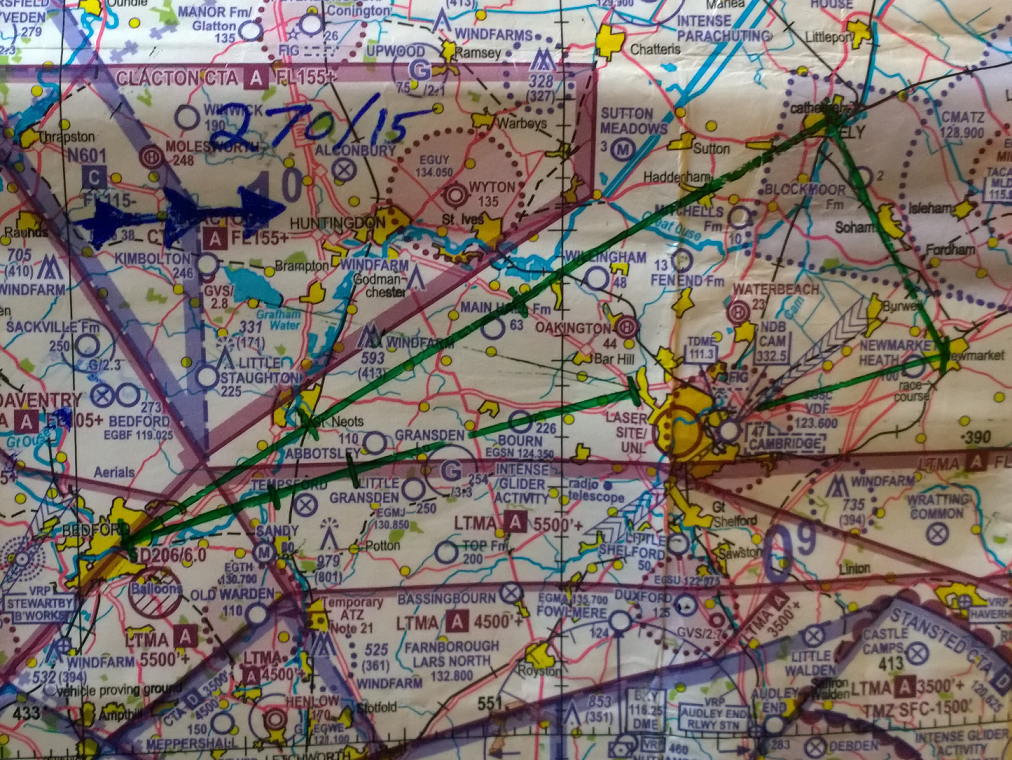
Bedford Leg

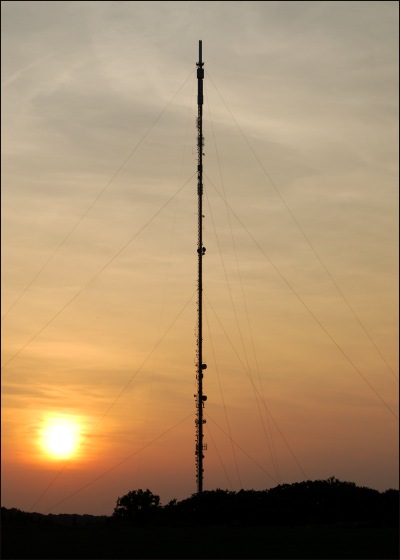
As I’ve mentioned before, there is a lit mast near Sandy, if you keep that on your left then this leg is pretty easy and you’re heading for a massive town of light so there’s not much that can go wrong.

Are we banking???

The lights of Bedford were ahead of me, the red beacon of Sandy was on my left, St. Neots on my right.  Everything out of the window was where it should be and looked level, but the Artificial Horizon/Attitude Indicator (AI) was wandering as if we were beginning to roll right.

Slightly instinctively I put some left aileron on to bring the wings ‘level’, but that made the picture outside start to look wrong.   Weird.   As the minutes rolled on the AI continued to show increasing roll, now suggesting I was in a 10 degree turn.   I don’t think so, something has died on the instruments.

For the AI to give up, your first thought would be to check the suction, because the attitude indicator is driven from a vacuum air-driven gyro (and the vacuum comes from the suction system).  No suction, no vacuum, no gyro – so no Attitude Indicator.  Yet, when you lose suction, the AI typically just falls over and ‘dies’.  If the suction system goes you’d also expect to lose other instruments, like the heading/direction indicator.   The suction gauge suggested we had good suction and the heading indicator seems to be happy.

I knew where Bedford was, so rather then just blindly follow the AI into a spiral dive, I just ignored it and trusted that the lights of the towns should be horizontal generally.  After all this is supposed to be a Visual Flight Rules flight 🙂

Ely Cathedral Leg

Once over Bedford it was the normally simple matter of making a turn, typically in level flight of 30 degrees, on to my new heading to go generally north east back towards Ely.  Simple except without the AI, the rate of turn cannot be measured the typical way.

So instead I used the Slip indicator which has a rate of turn indication which will show what is called a “Rate One” turn, on a Cessna 172 this is an ~17 degree turn.   I let my instructor know that this was my intention, just to ensure he was aware, as otherwise my turn would look really gentle and might have raised questions.   Though he knew we had no AI, so performing a rate one turn seemed like a fairly obvious fall back position rather then just guesstimating a 30 degree turn.

With the turn complete and a quick check of the direction indicator against the compass – just to be sure that was still working and I hadn’t just rolled out at some completely bonkers heading.   It was observed that the direction indicator was still working fine and strangely that the attitude indicator was now apparently working again.  Strange.

You can use any radio aids you like during your night navigation.  The obvious trick would be to use the Barkway VOR/DME, but that would mean having to change the DME from Cambridge to Barkway, check the station etc. then tune the VOR to Barkway, check the station and then see what radial we were on.   Simple enough things, but a lot of steps and you could happily burn 1-2 minutes with all of this faffing.   In my pre-flight planning I had a much simpler solution:

  • Leave Cambridge DME set up.
  • As we cross the A14, the DME should read 10nm
  • More and we were too far left, less and we were too far right.

Dead simple, unless we had a gross error we’d have to cross the A14 and dead reckoning means that with the best will in the world over 10-15 nm at ~100 knots you’ll need a hell of an error to arrive any sooner or later then within 1-2 minutes of your ETA.   It’s a very easy landmark, even at night, so as the clock approaches the overhead time, it’s a simple matter of checking the DME for distance to Cambridge.   There is only 1 point over the A14 that is exactly 10nm away from Cambridge, so if you cross the A14 with a DME saying 10nm to Cambridge – you know where you are 🙂

To reassure my instructor I wasn’t just making stuff up, I talked in through the above scheme and thus I was confident I knew where we were.   The other nice thing about this approach is that as you see the A14 approach you can correct your heading to line up with this known distance and thus put yourself on course.   A much quicker solution then using a VOR/DME to waste 2 minutes finding out where you are.  Then realizing you’re 2 miles off track and only then being able to correct it, by which point you’ve passed over your reference point and are chasing the navigation.

Anything you can do on the ground to reduce your work load in the air, is worth doing!
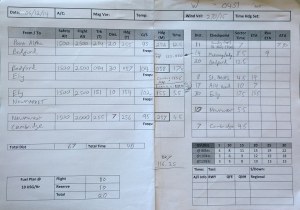
Night Rating - PLOG

Night Rating – PLOG

All that was left to do now was call up Lakenheath Approach and see if the USAF worked weekend evenings.   As it turns out, on this particular night, they did.   They gave us a MATZ (Military Aerodrome Traffic Zone) Penetration approval, and instructed us to Squark 0451.  You can see I scribbled the code down at the top of my PLOG, I’ve come to expect Lakenheath to tell you to squark a code and I’ve had one or two run in’s with them where I’ve found I forgot the code about 3 seconds after they said it, so I now have pencil in hand before I call them up.

Lakenheath are always accommodating of flying a GA aircraft through their MATZ, but their controllers also always sound a lot like they’d rather be fighting a war (or that someone has told them they’re at war already).  It’s hard to describe but if you ever fly into their MATZ you’ll understand what I mean – you thought you were flying around East Anglia, but if you closed your eyes and started speaking to Lakenheath you’d be forgiven for thinking you’d been transported to Iraq.   Still, they’re top folks and as I said very accommodating.  The other useful thing you’ll get from squarking the code they give you is that they’ll generally come back with a “Radar Contact…..”, which typically will include “X miles <Direction> from Ely/Newmarket/Cambridge….”.   Which is no bad thing to know as you can cross-check it against your own belief of location and confirm you are where you thought you were, or start to think about what’s gone wrong.  If you’re lost, talking to someone who has a positive radar fix on your aircraft is going to make you un-lost really quickly 🙂

I’d planned the route hoping that Ely Cathedral would be lit up at night with fancy up-pointing lighting that you sometimes see now outside large churches and such like structures.  It’s a really nice landmark in the day, so if it was lit at night (and I was sure I’d seen it from the ground with up-pointing lights) I imagined it’d look amazing from the sky.   Sadly, not so much, it did have a couple of spot lights pointing up, but to see these you really had to know what you were looking for first 🙁   The Cathedral was basically a dark patch north east of the city, but you could just about make it out.  Disappointing.

The clock was ticking past 40 minutes flight time, we still had to get down to Newmarket, then back to Cambridge, land and park-up.   This route should be almost spot on for a 1 hour nav, brilliant.

Newmarket / Cambridge

Lakenheath had asked us to report when we turned for Newmarket, as soon as I did this they clearly wanted rid of us off the frequency and they told us fairly rapidly that we could Squark 7000 again and free call Cambridge Approach.   They didn’t sound at all busy, but I guess once we were off their frequency they had even less to do 🙂

The distance you can see at night can make you worry about your timings, I estimated it would take us 5.5 minutes to get over Newmarket, but as soon as we’d turned I could see the lights of a town that unless our heading was wrong had to be Newmarket.  This felt a little disorientating because it just seemed incredibly close and yet we still had 4 minutes to run.  Working through a FREDA check (Fuel, Radio, Engine, Direction, Altitude) which is always a sensible thing after a turn I shined a torch on the compass just to make sure my heading indicator hadn’t lost the plot – as the attitude indicator was again giving up, there was a real risk of losing this as well.   The compass reassured me I was on the heading I wanted, we’d just flown over the Cathedral of Ely so we couldn’t be a million miles away from where we wanted to be and sure enough as the minutes ticked by we steadily approached Newmarket and the Dead Reckoning all came good.

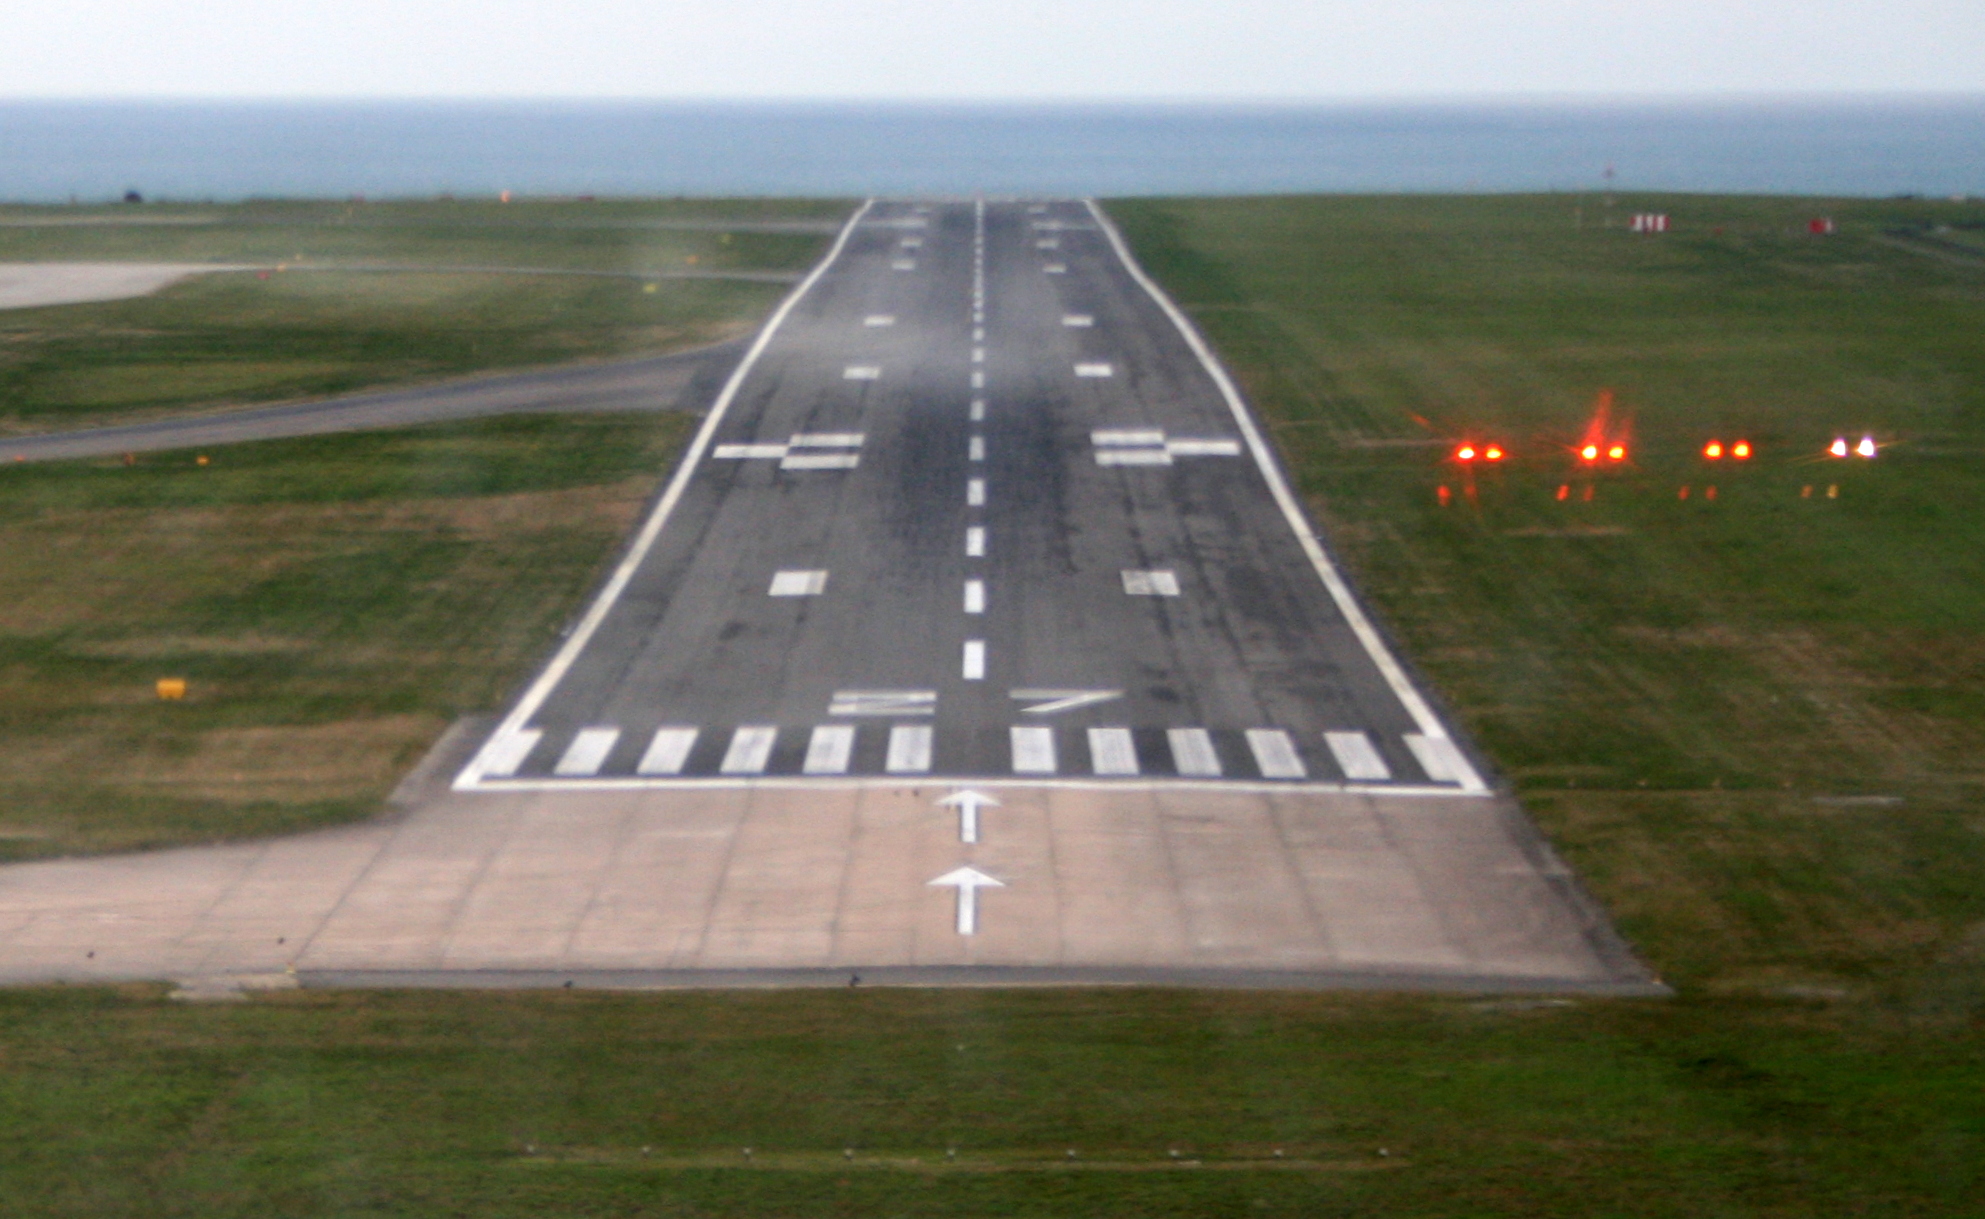
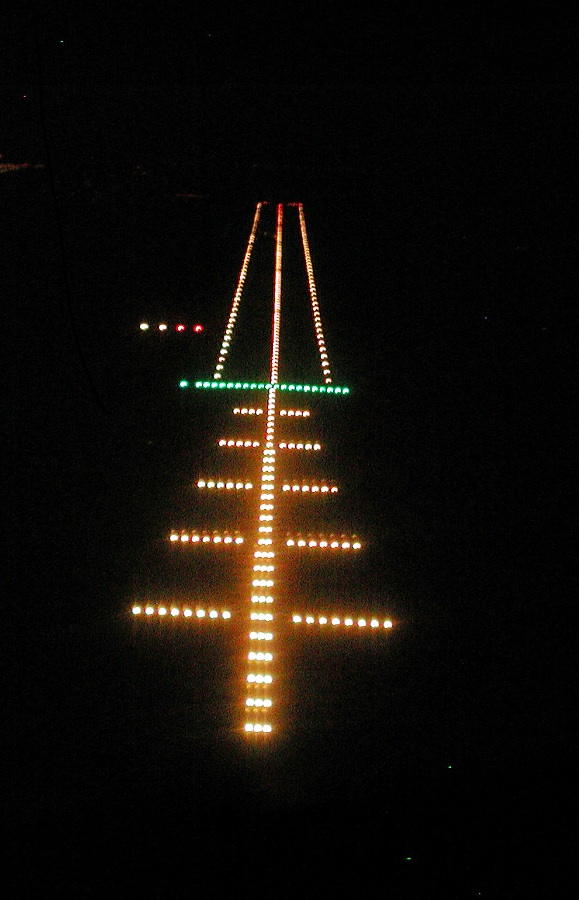
Finding the Runway: Omni-Directional Lights

Finding runways at night is a similar skill to finding them in the day, in that you first need to have a general idea of what to look for.   You might think spotting a 1 mile piece of concrete in the day is easy, go have a trial flight and see for yourself, it’s not as obvious as you’d think until you know the lines/features that tend to surround them.

Spotting the same thing at night, at any other angle then straight on for final approach is even harder.   The omni-direcitonal runway lights mean that from almost any other direction the runway “disappears” into the darkness.

Not surprisingly then it took me a lot longer then the instructor and we were sub-5nm before I finally felt confident I was going to line up for Runway 23 and not the A14! 😉

Remember the Pre-Landing Checklist

We joined left base, this saved all the cost of doing a big standard over head join etc. and was partly why I’d routed the way I had to come back in from Newmarket.   Lined up and coming down nicely on final approach everything was looking great for an on the numbers landing.    At around 50-60ft I realised the runway still seemed very dark and I was getting no reflection from it via the landing light – that would be because the landing light isn’t on then! 🙁    I kept flying the plane and said “ahh my landing light isn’t on”, it was too late for me to go reaching for it, the instructor got there but we were so low it became a landing without the landing light, equating to a bit more of a thud then I’d like but nothing to get excited about beyond the to be expected comment about the light being on the checklist.

Debrief

Nothing really said on the debrief, all in all it was a very peaceful flight in excellent weather.  A few bits and pieces could have gone better, finding point alpha, turning the landing light on etc. but the navigation itself went good and the landing was as good as any other landing I’ve done without the landing light and probably better then quite a few I’ve done with it on! 🙂

Caught up with the friend who’d asked about my route at the start, turns out he thought it looked so good he’d go and fly the same route himself and had essentially ripped it off and been flying about 10-15nm ahead of us.  So I’m sure RAF Lakenheath loved me for sending two Cessna’s into their MATZ.

The risk of the weather compromising my ability to finish the Night Rating is now greatly reduced.   All that remains is circuit work, I need to complete the list of failures/emergencies (i.e. total simulated electrical failure) and complete 5 solo full stop landings.   So watch this space!

Equipment: Torch

December 25th, 2014 by PHC | Permalink

As you progress along the Private Pilot License (PPL) course, you will inevitably accumulate equipment:  Bag, headset, flight computer etc.  In coming weeks I’ll be doing some posts on the equipment that I’ve accumulated, when it became useful and what has found a permanent home in my flight bag.

For the PPL course, a torch is unlikely to feature on your ‘things to buy’ list, but if you decide to do a Night Rating, then for obvious reasons I suspect like me you’ll start looking around for which one to buy.

Beam Colour

The text books will tell you that night vision (which can take up to 30 minutes to fully develop) is best preserved with red light, while even a few seconds of bright white light can destroy it and set you back to feeling like you’re in total darkness.   There’s an argument that subject to the intensity of the light, that green is better for your night vision then red, but I’m not going to get into all that – lets stick with the text book answer (the exam question does not start “discuss…”).

Torches Considered

It’s actually harder then you might imagine to find torches that put out red light, but of the ones I could find, I considered:

  • Gerber Recon Task Light Torch (~£20-30)
  • Coast PX20 (~£25)
  • LED Lenser V2 Aviator Torch (~£30)
  • LED Lenser P7.2 (~£40-60) – but would need a Red Filter kit (+£8)
  • LED Lenser P7QC (~£60-80)

The Gerber Recon came pretty close to being bought, I liked the fact you had options on colour (e.g. White to check the plane as the sun goes down, red for when you’re up at 2,000ft and the electrics fail etc.).  While the Coast PX20 and Lenser V2 could both be argued as capable of doing this, what I didn’t like about their approach was that they use separate ON/OFF buttons to achieve it – in the heat of the moment when you want red light, I very much suspect you’ll grab the torch, press the wrong button and be blinded in a sea of bright white light 🙁    Moments later you’ll be cursing why didn’t you buy the other torch.  Oh that’s right, it was more expensive…...you mumble to yourself while burning £3/min @ 2,500ft 😐

The P7.2 also got pretty close, what lost it the sale for me was:  First you’d have to buy the filters which bumps its total cost up, but more critically while this would then let you do the whole swapping of colours – without the risk of hitting the wrong button.  The idea of having to swap little filter caps around in the twilight before dark, it seemed inevitable that sooner or later I’d lose the little red filter cap and would have to shell out another £10 for a setup that’s already consumed £50-70 🙁

So in the end, even though at first glance the price seems pretty extreme for a torch, I went with the LED Lenser P7QC

LED Lenser P7QC

LED Lenser P7QC Horizontal

LED Lenser P7QC

As you’d expect from the price tag, the build quality is top end, aluminum with all the switches and colour rotary dial feeling engineered – nothing loose or ‘clicky’ anywhere to be found.   The case it comes with is quite a snug fit, I’ll admit I didn’t like this in the moments immediately following taking it out of the box but with a bit of usage, I now think I wouldn’t have it any other way.  It does ensure the torch can’t escape its case or leave you worrying it might do, which in turn has meant it goes very nicely into the flight bag.

Size wise, it’s the length of a closed fist (little finger, to thumb).  This feels about the right size, one thing to consider – especially if your first thought was to look at the “keyring” type sized torches is that most of the time you won’t need a torch in the plane.  You need it to check the compass in a C172 as it’s not illuminated and you might use it if the map light bulb has died etc.   But you’re generally not going to be flying along holding a torch in your right hand.   This means you’re going to have to put the torch somewhere between usage, but more importantly, it means you’re going to have to be able to find it again:  Amongst your chart, kneeboard, headset wires, flight computer and any other paraphernalia you fly with!  In the dark, potentially having just had a full electrical failure – do you really want to be rummaging around for a keyring?

It’s powered by 4x AAA batteries that go into a nice little holder device inside the handle, again someones put some thought into the design rather then just being cheap.  Nothing rattles and the weight doesn’t change as a result of loosely fitting batteries etc.   Batteries are included in the box, which is nice and at least saves you from the disappointment of getting a new toy and not being able to immediately have a play 🙂

Red / Greed / Blue / White :  Rotary Selectable

Independently selectable switches is just asking to go wrong, the Coast PX20 has 5 white LED’s and 1 Red.  So the red button is going to be quite dim, but press the wrong button and you will be assured of blinding white light by comparison.  Much the same story for the Lenser Aviator.

The P7QC solves the problem of switching colours, without using filters, by using an RGB LED and controlling the LED’s colour output via a rotary dial (which is part of the head of the torch).  This is a firm rotary selector, so there’s no chance it’s going to accidentally drift from Red to Green for example.

Set and forget…..

Power Modes and Flashing

So far you might be thinking that I’m a sales rep for this torch.  It has a lot of good things about it, especially compared to the competition – unfortunately for reasons that I suspect come as part of wanting to appeal to a wider sales base then just night pilots of general aviation aircraft, it has a couple of things I wish it did differently.

High Power / Low Power

The torch has 3 modes of operation:

  1. High Power
  2. Low Power
  3. Flash (SOS)

Turning the torch on for the first time it defaults to high power (~120 lumens, colour dependent).   This is my first real gripe as it’s not the default you really want for a confined cockpit.   Oh don’t get me wrong, I very much think having a high power mode is beneficial, I just wish it wasn’t the default – I’d have much preferred it to toggle through:   Low Power, High Power, Flash.   This to me would more naturally let you find the mode that achieves an objective, rather then starting out full wack and if that’s too bright letting you turn it down 🙁

Here’s the torch on its side, set to red light and turned on at High Power:

Red - High Power Mode

Red – High Power Mode

Now compare the strength and throw of the beam, to what it looks like in the same setup but on Low Power:

Red - Low Power

Red – Low Power

Hopefully it’s strikingly obvious which one you’d want to use for reading a chart or compass about a foot in front of you! I’ve purposely shown the beam strengths like this because how far the torch can throw a beam of light might be a requirement for someone looking to do hiking/camping at night, but it really isn’t a major concern for flying.

This “how bright can we make it” issue however is true of almost all torches you’ll find.  The selling point is all about how bright they are or how far they can throw a beam of light, rather then how dim they go 🙁

Having flown a simulated electrical failure with the LED Lenser P7QC, I found the low power (manual says its ~40 lumens) was actually pretty much perfect for what you want.   On low power you can chuck the torch on your seat and it very nicely lights up the Airspeed Indicator, Artificial Horizon, RPM etc. but at the same time. The beam isn’t blinding to the right seat passenger and while it still means you can just about see the flaps lever of a C172, it’s not flood lit, so you’re not inadvertently distracted.   I could have lived with it being a touch dimmer actually, but when it came to landing the plane in simulated electrical failure, I was very glad of the fact I didn’t need to hold the torch in one hand to see the airspeed indicator and could keep my left hand free to fly the plane and right hand on the throttle all the way down to landing.   A torch forcing you to have only intermittent throttle control with no flaps/electrics I feel would be bordering unsafe, because with no flaps the stall speed is increased & you’ll be trying to fly a faster airspeed on approach – you want good airspeed monitoring all the way down and to be able to fly the plane, rather then starting to let it fly you because you’ve ran out of hands 😐

I just wish low power was the default mode.

Flashing

When you need a torch to flash, you’re having a very different sort of emergency or more to the point you’ve had the emergency, are lucky enough to have survived it and now just want to go home 🙂   So for all those times when you want to work with a torch (i.e. read a chart), rather then hoping it will do something for you (attract attention/rescue), you won’t want the thing to be flashing!

They could therefore have dropped this feature entirely for me.  I can accept that if you’re incredibly unlucky you might find yourself in a situation where you want your only torch to maximize it’s attention grabbing capabilities – but it’s going to be a pretty rare case (or I’d hope it is).

The torch toggles its modes if turned OFF/ON within 2 seconds of turning off, so if you want Low Power you turn the torch ON, then OFF, then reasonably quickly (or very quickly) back ON.   Great, unless you accidentally go past it and then you’re into Flash 🙁   It won’t return to default unless left OFF for 5 seconds, so if you turn it off low power accidentally, more then likely you’ll have to cycle through flash.

If they had to have a flashing mode, I just wish it was accessed through a much harder to activate process rather than as part of toggling through the modes via the ON/OFF switch.

Conclusion

I bought this torch after my 2nd Night Rating lesson, prior to buying it I’d borrowed torches off instructors – which was getting a bit tedious.

It’s heaviest usage to date has come in my second aircraft failures/emergency lesson as I’ve mentioned above, which simulates internal lighting failures, full electrical failures etc.   If I wanted to be convinced it was a good torch to buy, this lesson alone convinced me.   It’s low power is not so bright that it will illuminate the world, but bright enough that you get a nice red hue across all the important instruments, while the torch can just sit on the seat, allowing you to keep flying the plane almost entirely as normal.

LED Lenser P7QC

LED Lenser P7QC

The size and weight are both excellent, making it easy to find amongst charts and kneeboards.

Being able to ‘set and forget’ the light beam colour and have no risk of pressing the wrong button mid-flight was a major feature for me.  Especially as the solution they use doesn’t involve hot-swapping filters.

High Power mode is way too bright for usage in the cockpit, but good for externals checks and/or finding the plane keys should you drop them 🙂

Low Power mode is near perfect, perhaps a little dimmer would have been nice.  It’s a bit of a shame though that this is 2 clicks away to access rather then being the default mode – it’s absolutely fine for when the internal lights fail, but it’s a little bit tedious when you just want to check the Heading Indicator & Compass are aligned.

Flashing mode, it isn’t really needed for 99.9% of GA flying – but perhaps should you ever be unfortunate enough to fall into the 0.1% you’ll be thankful it was there and all the times you’d accidentally clicked past low power mode and on to flash will be forgiven (A lot like wearing a life jacket over water, it’d be more comfortable if you didn’t have it, but if have to land on water you’ll quickly forget about creature comforts 🙂  ).

So given it’s around the top end of the price range for what you can spend on a torch on most flying websites etc.  (I’m sure there are tactical super torches that have bells and whistles that cost much more).    Am I happy with it?  /  Would I buy it again? :    Yes, it’s found a home in my flight bag and I’m not looking to replace it at all, the cost is now lost in the noise of an hours flying etc.

Recommend it to a friend/learning to fly (at night) etc.   Absolutely.


Night Rating: Part 2 (Failures)

December 22nd, 2014 by PHC | Permalink

You could also call this lesson “emergencies” but most of the things we’d be doing were more about getting experience with landing the plane under an acceptable failure condition (e.g. loss of approach lights), rather than a genuine fully fledged emergency (e.g. engine failure).

In my PPL training I was swapping instructors almost every lesson, but it was pretty normal to be back flying with a familar instructor again every other month or so.   I was now swapping instructors for my night rating and to my slight amazement, I had to actually go back several pages in my log book to find when I’d last flown with this instructor – even though they’d been instructing me right to the finish of my PPL.   Goes to show how many flights I’ve done in the year I got my PPL, it’s been a good year 🙂

Briefing

PAPI lights

PAPI lights

We’d go fly some circuits, the first one would be completely normal just to settle down into things (flying can be a bit like stage fright, you can do it, but in the hours before turning the key you do sometimes find yourself wondering “Can I remember how to fly?”).

Then it would be a progressive set of challenges:

  • Landing without the PAPI lights
  • Landing without the approach lights
  • Landing without the airplane landing light
  • Landing with none of the above.

Check the Fuel and Oil and lets go

My training has drilled me to check everything, even if an instructor has just landed the plane and swears it’s all good – I’ve been drilled to check it anyway, if you go on any flight safety training lecturers the old and the wise (pilots who are one, tend to be the other) they will also stress to check everything.

This all sounds great in text books and it’s good safe, sensible stuff.   What it also means though is that when I try to deviate or short circuit around blocks of the check list, I find it all gets into a starting up muddle.

You find stupid things happen, like you jumped past the pre-startup internal checks and you’re now trying to start the plane – but wait, turning the master switch on was on the previous page, so you haven’t done that, so you have no electrics.   Switches get missed, flaps get left down etc.  and as you try to untangle the “must change state of” items from the “just check” items, you begin to feel surrounded by an aura of feeling like you should know how to do this……and yet you’re messing up!   You’ve done it hundreds of times before, feels surreal therefore that an 80+ item checklist isn’t engraved into your memory (hmmm, strange that!).

So I sort of hate doing the “lets just jump in the plane and go” approach.  I can do it at farms & places I’ve just landed, but I can’t seem to do it when I’m getting in a plane that someone else has flown before me – I’ve found on too many occasions that the previous hirer has left the radio on approach instead of tower, or the lights set weird or the fuel selector set wrong!

After a little bit of awkward faffing about and looking like a student all over again, the engine was running, ATC had cleared me to taxi out and we were away – the nerves could begin to calm down now.

Circuits :  Lights On, Lights OFF

Approach Lights, PAPI's & Runway Lights

Approach Lights, PAPI’s & Runway Lights

The wind at night is a strange thing, it can seem like the calmest day and then you get up 1,000ft and find it’s 20 knots crosswind to the runway.

On my first circuit I turned downwind and was quickly finding myself getting pushed more and more towards the runway.   There’s a good roundabout reference at the end of the downwind leg which is an excellent guide for both ensuring you fly a sensible sized circuit and going just beyond it, a good turn point for turning base.   I found that by the time I got there I was left of it, meaning my circuit was tight and the wind was pushing me in – no surprise then that when I turned left on to base leg, the crosswind became a tailwind and made matters worse.

I could lose the height ok, though my groundspeed was feeling pretty rapid in which to do so, but I found I had to turn on to final approach sharpish and while still trying to lose the height.   If you do all this to close together your nice rectangular circuit pattern starts to look like a military style continuous turn.   That’s ok, but I’d overshot the centre line of the runway and had to correct it to get it all lined up on final.

Other then the overshoot, the height was good, the speed was good and everything came together in the end for a nice enough landing.

Do it again without the PAPI’s

What the PAPI’s give you are a visual guide on your height, you want 2 red and 2 white, this means you’re on an approach angle of 3 degrees, keep the PAPI’s looking like this all the way down and they’ll guide you gently in over the runway at a nice casual approach.   More red then white equals low, more white then red equals too high.

One interesting point, typically GA aircraft in daylight don’t do 3 degree landings, they tend to do 3 white, 2 red and come in at a steeper approach angle then a jet would.   At night though, 3 degrees is what I’ve been told to fly.

Without the PAPI’s all you have are the approach lights and the runway side lights and you have to use these to judge your approach angle manually.   Which isn’t as easy as just following 4 lights in blind faith that they’re set right 🙂

Farms, Farms and Farms……..I love farm strip flying, I can’t encourage you enough to get an instructor to teach you how to do it and then go get some practice doing it.   My landings got better when I started farm strip flying, nothing I’ve done has improved my landings more.

So without the PAPI’s, there’s a pretty simple way to ignore all that text book stuff about runway perspective or trying to lean on your local knowledge of what the runway looked like the last 20 times you circuited on it etc.    Remember that the book says “Constant bearing, constant danger”, well the same rule applies to landings:   If you keep a point (e.g. the runway threshold lights) held constant at a position in the window all the way down – you will/can land there!    Of course if you have too much speed on at that point you’ll go into ground effect and float for another 150m but that’s your airspeed control going to hell, you’ll still be given every possible opportunity to flare it and make a good landing on the runway.   PAPI’s or no PAPI’s.

All you need to focus on therefore is that you want your airspeed in check around the same time as your landing point out of the window begins to stabalise its position.   Once you’re doing 65 knots, with the runway threshold held constant out of the window, your approach angle is going to be about right.

I found myself again getting blown in like crazy, again overshooting on the turn on to final.   However, the lack of PAPI’s really didn’t come as any bother at all.   I found I made a whole bunch more minor adjustments on the throttle and elevator as I point and powered my way to the landing point, but it was still a pretty well controlled landing.

No Approach Lights

This is stranger to fly then not having the PAPI’s, there’s something quite welcoming about the approach lights leading you to the runway.

Still you have the A14 and A1303 as visual references and the green strip of threshold lights at the near end of the runway.  So the main thing the loss of the approach lights does is make the runway/airport feel much, much smaller.

I messed this landing up a bit, as I touched down my left foot slipped and tapped the brake causing the unwanted sound of the tires to screech.   The touch down speed was slow and we hadn’t landed with the brakes on but the rolling speed was too high to be touching the brakes without them making noises about it.    There’s a good reason that ‘feet clear of the brakes’ is on the pre-landing checklists, if you were to land with your brakes on during a skills test – you’ll very likely fail for a dangerous landing.  The fear being that if you touch down at speed, brakes on, if both are on then the wheel that touches first will want to rotate the plane, or both will touch down and the tires might quickly want to give up the game.  With only one brake on you’ll be at risk of flipping the plane as it rotates around the differential braking.  Not a great idea.    This was nothing quite so serious, but I totally accept the principle it’s a bad thing to be doing, so I wasn’t thrilled with myself on this landing.   Still, you’re always able to learn from events.

No Landing Light

If you’ve ever seen a light aircraft come into land at night, you’d be forgiven for wondering why bother with that landing light anyway – it’s hardly illuminating anything.   True until about 30ft, when it is quite effective at illuminating the runway surface, critically what it provides is depth perception.

With the landing light on, those last 30-50ft before touch down can be done watching the runway come “up” to meet the plane (I know technically the plane is coming down to meet the runway, but it appears the other way around as you fly it in).

So without a landing light, getting the plane down to 50ft and over the runway should be easy enough, but judging when to flare it and estimating when the main wheels will be touching down on the runway becomes tricky.

Making sure my heals were on the floor and my toes were handling the rudder this time, I got it about right.   I was off maybe a couple of foot on the last few feet of height in the flare so a little flat, but not bad for a first go without a landing light.

All the lights (except runway lights):  OFF

The rule is you cannot land and must go around if the runway lights fail.   The reason is that without them, you’ll just be aiming for a now black centre line, somewhere in a sea of blackness.   It’s really not a safe idea!

Everything else is desirable, but not essential to the safe landing of a light aircraft, so time to see if I could put the plane down without any of the other lights.

Getting down to the runway I found easy enough, but again the real decider on whether I could pull off a perfectly smooth landing or with a slight thump seems to be the lack of a landing light.   Without it, it’s just hard to estimate those last few feet of where the main wheels are relative to the runway.

Still other then the one in the middle, all my landings I’d been happy with.

Debriefing

Again not a lot to be said really, everything seemed to up to a sufficient standard to keep progressing.

The plan for the next lesson would be to get the Navigation done, before the weather really turned on us.   This could be any route of my choosing as long as the flight took 1 hour and covered at least 27 nm (I can’t imagine how you do a one hour flight and fly less then 27nm to be honest, but the distance is a CAA criteria – I’m sure someone has a good rational for why there’s a distance requirement).

Night Rating: Part 1 (Night Familiarity)

December 17th, 2014 by PHC | Permalink

The night rating is one of the easiest ratings to add to a license, so as winter is now well and truly here and any hope of farm strip flying would now be the reserve of the incredibly lucky or foolish (generally I like to think I’m neither of those).  Seems like a good time to go get another stamp on my license 🙂

Why get a Night Rating?

Everyone’s reasons will vary, I’ve already given one of mine above but here’s a few more:

  • Escapism:  Want to escape into that childhood fantasy of getting into a bomber and taking off in search of finding a dam?    Just turning a Cessna 172 on at night with a red torch in hand is fun.
  • November – February in the UK:   It’s typically damned cold at 8:30am, during my training I quite enjoyed taking a broom to an aircraft’s wings on several frosty winter mornings.  However, if you’ve done it three or four times, you’ve probably done it enough.   Flying later on in the day is typically warmer (but not by much).
  • If a city looks nice during the day – it looks better at night.
  • You might not want to do loads of night flying, but from October-Feb, a flight taking off at 2pm is going to be at risk of coming back in the dark and if you have to divert, then what?   A night rating will keep it legal.

What’s involved in getting one?

No exams, just five hours of flight training, to include:

  • Three hours duel instruction
  • One hour (at least 27nm) Navigation
  • 5 solo full stop landings.

For more information, see the CAA website.

Lesson One:   Night Familiarisation

To get used to the essentials of night flight:  From airport lighting and how taxi speeds will appear very differently (out of the front window you’ll feel you’re going slow, now try looking left!).  To what cities look like and gain an appreciation of just how far out you can see at night.  A town you wouldn’t normally see straight after take off in the day, can be instantly visible at night – which can be disorientating.

Now technically I’ve sort of done this lesson before, but that was so early into my PPL training it’d be good to repeat it.

Satisfactory handling, must learn to land before continuing.

That is what I’m told it says in my training record for that first night flight – gives you an idea of how long ago it was!   Since then my landings have come a long way.

Checklists at night

Pilots love check lists, if you don’t I’d suggest strongly that flying isn’t for you – checklists, charts, plotting routes and manual calculations are all part of the ground fun that should be an aid to building the anticipation of next going flying.

Checklists in the day are one thing, at night with torch in hand, an array of instruments & switches before you.   It doesn’t get much better, at least not on the ground.

The Route

The plan was a pretty leisurely local area flight, we’d take take-off and then turn around to fly north to Newmarket.

From here we’d do an orbit of the town, before heading back to the airport.   Ask them for a zone transit (to allow us to fly through their aerodrome traffic zone [ATZ]), to get more familiar with the lights of the airport and when you can/can’t see them.

Head north west towards Bar Hill, getting familiar with the A14 at night and then turn it around and come back to Cambridge for a few circuits and get familiar with landing it at night (remember the last time I did a night flight I’d NEVER landed a Cessna 172 – I’ve done it hundreds of times since, but this would still be the first time an instructor had ever let me land it at night).

……even when you have your license, the first times can just keep coming.

Clear Skies – amazing views & almost incredible distances.

No sooner had we took off, you could immediately see Newmarket and the A14 leading the whole way.   I did find myself feeling a little unsure of what I was seeing and where things were for sure.   When you have the background noise of a Cessna 172 engine and you’re so used to seeing the day time landmarks etc.   It suddenly is a bit weird for example to not be able to see the wind farms to the east of Cambridge, but instead be able to see the bright lights of Newmarket & the runways of Mildenhall / Lakenheath.

Some great views of the town centre while orbiting, at only 2,500ft I sort of wonder how it looked from the ground 🙂

Sandy Transmitter Mast

Sandy Transmitter Mast

Heading back to Cambridge Airport we were cleared for a zone transmit, not above 2,500ft, as they had a fast jet coming in at 3,000ft.   Suddenly 2,500ft ceiling sounded very wise, the last thing we need is to go arguing with a fast jet – the approach speeds of a light aircraft flying at 115+ MPH and a fast jet doing 250+ MPH alone will make your mind boggle.

There is a big transmitter mast near Sandy, in the day it’s quite impressive to fly past (and will make you think twice about any low flying ideas you might have!).   Normally you cannot see this mast until you’re within a few miles of it.   However, at night because it’s over 300ft above ground level, it is lit by a red beacon light.   This makes it visible from Cambridge!  (20 miles away).

Heading north to Bar Hill we could hear on the radio that another club student, also getting their night rating, clearly had an instructor on-board who liked the idea of the route we were doing and was copying us.  Normally you wouldn’t know, but they also had to get a zone transit to follow us.

On the way out I got some top tips on just how dark the dark parts of the world were and a reminder on the idea of trying to land at an unlit runway was just going to be impossible.  You can really see why, from 2,000ft you just have black and bright light.   Who knows what is in the black parts – sure it could be a field, it could also be a house with its lights turned out!

Coming back to Cambridge:  Engine Failure

The plan was to come back to Cambridge and do a couple of circuits.  We joined the circuit and followed a PA-28, which rather tediously seemed to then go and do the worlds largest circuit!  🙁   As we were number two I had to entertain trying to follow them round, they were so wide that their base leg was pretty epic and to try and give them some time on final I told my instructor I was deliberately going to extend the downwind leg.

As I turned onto final, I was pretty pleased with how well my separation plans had worked out.   There was no reason they wouldn’t be able to land and taxi clear and then we could get clearance for our touch and go.   What could go wrong?

Cambridge Tower:  We’ve had an Engine Failure on the runway.

You’ve what!?!?   On the what?!?   How the what?

Go Around

It was followed by an immediate call to go around from ATC, the training drilled into me, kept me going here – but my brain was still racing to figure out what had happened to the PA-28.

They were landing, in fact they HAD landed!   So how had they had an engine failure?   Is that even possible?   Like I said, you can have first times – even after you have your license.

Whatever the cause, they were stressing air traffic control out, you can understand why.   They now had their only runway blocked by a plane, with two Cessna’s destined for Cambridge in the local area and a fast jet a few miles out.   Now this is a fully fledged & night licensed airport, so they can shift a plane – but having to, while managing a load of other circling planes isn’t going to improve their day.

Best theory in our plane was that they’d landed, brought the throttles back to idle and the PA-28’s idle setting had been set too low and this had just let the engine stall.

This theory was, very likely, soon confirmed as while we were getting back on to the downwind leg for another go as if by magic the “failed” engine had been restarted – bet that did wonders for their avionics 😉

Landing

I don’t mean to sound grumpy about it, but their little antic on the runway cost me a touch-n-go, so I would have rather they not have had the issue.   Sometimes these things can’t be helped though and one day it might be me having the awkward moment, so I try to sympathize.

Got a nice approach, brought the Cessna 172 down over the threshold and touched down just past the numbers so I was pretty pleased with the landing.

Still a bit unfamiliar with the lights leading off to the taxiway, it’s one thing to know the theory, it’s another getting real experience, so a few words of advice for where to turn off and some local knowledge that ATC wouldn’t ever ask me taxi past Charlie as Delta isn’t lit.

Nothing significant to be said in the debrief, think all in all the instructor was generally happy with my flying.

Next lesson would focus on landing the plane with various failures, both at the airport and within the plane.

Keyston Farm Strip

November 30th, 2014 by PHC | Permalink

Look on your chart and you won’t find this place, nor will you find it in the standard flight guides.  It’s in Lockyears Farm Strip Guide, very fittingly – strangely it also appears on Skydemon Light

Keyston Farm - Overhead

Keyston Farm – Overhead

It’s a little farm strip to the north west of Cambridge, I first came across it through searching Google Earth for nearby airfield looking shapes (the best places aren’t on the chart and sometimes a few phone calls can find out who owns the land and get you permission).  A bit of a bigger investigation revealed this was a farm that was right next door to The Pheasant pub – now I was really interested, the phone number you need is on the pubs website, go have a look, just give the farm owner a call first and Prior Permission (PPR) seemed super easy and the owner pretty relaxed about visiting pilots – not being on the chart I was half expecting to give my speech to politely try and talk them into giving me PPR, but no such thing, just a “Yeah sure no worries.”

Just 26nm away, as the crow flys you can be there in 15 minutes.

Do your homework when Farm Strip flying!

It’s all well and good someone you’ve never met before saying it’s cool for you to come try and land a Cessna down on their farm – but you need to remember this is a flight to an Unlicensed bit of grass (airfield would be far to grand for the reality of most farm strips).

I’ve found that I like to try and do a little homework first:

  • Google Earth the place:
    • Any hedges, public footpaths going straight through it?
    • Remember that Googles data is often out of date, but it’s better than nothing.
    • Google Labs has a neat feature for Measuring the ground, even if the farm owner or guide has told me how long the strip is, I like to measure it to be sure.
  • Check the weather at local bigger airfields
  • Think seriously about your diversion plan, it’s more likely that you won’t like what you find on arriving at a farm then it is on arriving at somewhere like Cranfield Airport.

A windsock is a nice to have but most farm strips don’t seem to have them, not essential, but anything you can do to have a plan of where you might see some smoke rising (a local factory, a nearby cottage etc.)  is good local knowledge to have as you can use that smoke to tell you what the wind is doing.

Preparation Prevents Poor Performance……it’s also been known to save lives 😐

Briefing & Passengers

Route to Keyston

Route to Keyston

Flying with one of my best friends, I always brief my passengers – it’s a standard script, that has a couple of extra notes about farms.

Passengers, more so first time ones, are an interesting dynamic.  As the Pilot you’re responsible for their safety and one thing I always try to remember is that even though someone might be up for going for a flight in a light aircraft.  If they’ve never done it before, a variety of nerves, anticipation, uncertainty and varying degrees of confidence will be at play.

My passenger seemed happy to go into a farm strip and had been in light aircraft before, so we could stick to the planned route.

Flight out to Keyston Farm

The other thing first time passengers do is slow your best thought plans right down.  It’s not their fault, it’s a function of never having been in a light aircraft before etc.  I was the same the first time I jumped in a Cessna 172 – where’s the seat belt?  How does it work again?   How do I get the seat to go up?   How do you get this door to close?

Other than running a bit late as a result, the taxi out was all good, ATC were great as they so often are at Cambridge no real delays at all.

Once over Point Alpha Keyston is a very simple navigation:

  • Point the plane at Grafham Water, once there you’ll be within 8nm
  • Keep the A14 on your right and when you see Molesworth, you’ll be virtually on top of Keyston Village
  • There’s a church in Keyston that’s quite a good reference, the big green hangers of the farm are also excellent landmarks.

The strip itself is actually really well maintained, if you’re used to farm strips from the sky then you’ll spot it easily – if you’re not, I’d say Keyston won’t be the easiest to spot.   However, it’s position to Molesworth and the A14 means that if you get the Nav wrong, you’re not going to be left searching for a strip of grass in a field, surrounded by fields! 🙂

Safety trumps Noise

On arrival overhead I was making traffic calls on the safety comm frequency, I joined overhead and it was looking great.   A nice downwind circuit and I was juuuust about to turn base, when with one last glance at the windsock, I paniced myself, convinced myself I was about to do final approach with a tailwind and bailed from the approach.

Making calls that I was repositioning for wind, I never backtracked my thoughts properly, I just repositioned and setup a circuit for the other direction.

Coming in on final, we came in with a really fast ground speed (over time you do get used to judging ground speed relative to the movement of ground features etc.) – what the heck was going on!   I wasn’t happy with it at all and elected to go-around.

Another look at the windsock:   Idiot, I’d read it right the first time, in a moment of weakness on the first circuit I’d misread it, talked myself out of my original plan and decided to change the circuit direction………the original plan was right all along.

I’m sure the village of Keyston wasn’t massively pleased with a Cessna buzzing round for 5 minutes, but I wasn’t about to press-on into a field with a massive ground speed if it’s not safe, just to try and save them from the noise.   Sure I’d made a mistake, but the best result will come if everyone walks away from it safely and an afternoon at the pub is enjoyed by all 🙂

Point and Power Landing

Since completing my farm strip training, I’ve become a total convert that ‘point and power‘ is the way to land a plane if precision of the touch down point is your primary objective.   I’ve done a bunch of farm strips prior to Keyston – I’m not an instructor so please don’t ignore professional advise as it’s probably geared towards your own strengths/weaknesses – but once you are fully competent at landing, I’d encourage you to find an instructor that you can learn this technique from or attempt it under their supervision etc.   I’ve found it really helps me to put it down where I want it.

Keyston has rough terrain at the edge of its northern side and a footpath, so landing short would be a really bad idea.  Measured on Google it’s about 700m end to end, but as I now have local knowledge it’s on a descending slope (north to south), so if you land to far into it from the north you’ll have gravity against you.  There’s a hedge to stop you at the other end 🙁   Farms are like that – but I wouldn’t worry by the time you get there the gradient is getting pretty serious, though nothing like Tower Farm near Sywell.

I now had enough knowledge of the strip and the surface winds, one advantage of having come at it from both ends, that bringing the Cessna 172 down nice and slow with an airspeed indicated of 55 knots was no problem.   I think I could have got it down to 50, such was the wind, but I wanted a little bit more power on as around 50 the stall warner will start to go crazy as you cross the threshold and with first time passengers, that’s not necessarily ideal (though he had been briefed it might happen).

The wind just dropped ever so slightly on the touch down making it a thump rather then glide touch down, but our ground speed must have been almost zero – we were at taxi speed in well under a quarter of the runway used.   Not trying to be competitive but getting it stopped in waaaay less runway then you have available is a great feeling every time, at farms it’s a bigger rush and why I like farm strip flying soooo much (remember that there’s a hedge to greet you at the other end if you’re the sort of pilot that ends up floating it for half way the runway!)

G-HERC Parked at Keyston

G-HERC Parked at Keyston

One interesting thing to note, if you look carefully at the above picture you’ll notice there are some people in the background.  They literally turned the corner and started walking on what effectively is a runway, moments after we touched down – farm strips are interesting things, to a pilot they’re a runway.  To someone out walking their dog, they’re a public footpath or a bit of grass for the dog to run free – you need to keep an eye out for such things.  It’s a dynamic of dealing with an unlicensed strip.

The Pheasant Pub :   Reason enough to fly to this farm!

Everything about Keyston is cool, the landmarks are picture postcard stuff.   The strip is well maintained and I really enjoyed flying and getting the landing done here – I’m coming back just because the strip is great.   However, the icing on the cake is that once parked up, you just walk down a 2 minute farm trail and you’re at the Pheasant pub.

Sadly the one down side with being the pilot is I cannot drink, the rules on blood alcohol levels area quarter of that of driving – so the best advice is to simply not touch a drop of the stuff.

That said, what a great little place to fly into for lunch!    Friendly staff, good food (Massive chips), pretty reasonable prices – just all good, why would you not come here 🙂

The Pheasant Pub Keyston

The Pheasant Pub Keyston

Oh and although farms don’t typically charge you to land, this one has a donation system of £10, just tell the bar staff etc.   Not the cheapest, but location, location, location!

The Flight Home

After an enjoyable hour or so in the pub, it was time to head back to the plane and head home.   We’d been on the ground a bit longer then I’d planned, so we decided to cut the return journey short to a direct return to Cambridge.

On the walk back we passed some walkers who inquired about if we’d flown in, I guess they’d just walked past the parked up G-HERC and seen the hi-viz jackets in hand.   Can you think of a better way of getting to a pub then flying in?  They seemed to agree it makes for a pretty nice day out.

One advantage of flights out of farms:   The time from Taxi to Takeoff is minimal

I selected a decision point for aborting the take-off if needed, then fired up the engine and taxied up to the far northern end of the runway, giving myself as much runway as physically possible.   The strip drops off towards its southern end and I didn’t want to be fighting a plane going in and out of ground effect as the runway rolled away from under it etc.   10 Degrees of flap for best short field take-off performance, holding it on the brakes while bringing it up to 2,000RPM.   One last check my passenger was happy and not messing with seat belts or anything.   Then it was simply a matter of releasing the brakes and charging down the grass strip.

Airspeed came alive pretty sharpish, it was a comfortable take off.   Grass strips tend to be a little bumpy but as long as they’re dry and you manage the elevator a little so you’re not putting weight onto the nose wheel, the take-off from a farm should be not much different to a take off from any grass airfield.

The flight back to Cambridge was uneventful, if anything the weather had greatly improved from when we’d left – just as it had been forecast to do.   The circuit traffic back at Cambridge was nice and low for once, so we got a right base join, shaving about 5 minutes off the flight time ~£15, so that paid for the landing fee at Keyston, big thanks to ATC 🙂

A great day out, but sadly probably the last farm strip I’m going to do this year:  The weather is beginning to turn for the worst and as the nights roll in, it’s an ideal opportunity to get a Night Rating done.


Farm Strip Skills: Part #3 (Completed)

November 3rd, 2014 by PHC | Permalink

Farm Strip #3 Chart of route

Farm Strip #3 – Chart

The general scheme for this course is 1 hour revision, 1 hour land-away and finally an afternoon of land-aways.   Part #2 got scrapped due to weather, but thankfully the instructor said we could progress to the final part, do the afternoon of challenging farm strips and if I had no issues with them, he’d consider it a done deal and I’d be free to go fly farm strips on my own.   Time to impress then!

The weather was looking great, so no excuses.

Briefing and the Afternoon Plan

No PLOG for this trip, everything on the map again, general plan of attack was to fly up to White Fen farm (not even on the chart!) for a full stop landing, but we wouldn’t get out, then up to Sempringam Fen Farm for a touch and go and a full stop landing.

Neither strip is very big, ~470m x 16m

What makes farm strip flying interesting to me is if you crack open the C172 SP Pilot Operating Handbook a little bit of math will tell you that the plane won’t stop at full weight and zero wind in anything under ~580m.   So you can count these places out if you plan to tank up and take the family, to get into them less fuel is good and fewer passengers, even better.

White Fen Farm

Because this blog post is much delayed, I can tell you that farm strips aren’t always easy to find even with the advances of Google Earth.   Even now I find it essentially impossible to pin point you to where this place is.  Probably a good thing.

With about 2 nautical miles to run I finally spotted the place from the air.   East Anglia is flat and a shade of green/yellow almost everywhere that isn’t a town.  So spotting ~500m of straight grass amongst a sea of grass is harder then it sounds!   That said, I can think back to when I first started to learn to fly and instructors would ask if I could see Cambridge from 7nm out, forget it!   Today I’m so used to the shapes of airfields I look back wondering how I ever missed it, but experience teaches you what to look for.

Making radio calls on a safety com frequency as we joined “the circuit”, to no reply, I really focused on making sure I got my downwind/pre-landing checks in and then really put the effort in to ensure a good circuit, good height and to not turn on to the base leg until I was sure I’d have enough distance on final to get it down in one go.   They were kind enough to let me come and land at their farm, the last thing they need is a C172 buzzing the house on go-arounds if I could avoid it.

My top tip is to not turn base until the runway threshold is just about to disappear out of the rear side window.  If you fly a circuit of about 0.5nm (1km), this should give you, rough numbers, just under 0.5nm final approach which should work, without buzzing the next village down the road etc.   Any sooner and you’ll be trying a military continuous circuit and your workload will sky rocket, any later and as I said you’ll probably just upset the owners neighbors and never be invited back 🙁

Taking care to not come in short, but also not hit the tree on the right it was a pretty nice touch down.  I think if I could do it again I’d like to have touched down maybe 50m sooner, but I was happy with my airspeed control and the landing was controlled and not slammed.   Tick in a box.

We taxied down to the far end and due to the light winds take-off direction was much of a muchness, so just spun it around at the other end.   10 degrees of flap for best short field performance, brakes on and throttled up to 2,000 rpm.   One last check the instructor was happy, then release the brakes and charge down the grass strip.

Airspeed Indicator comes alive, now it’s about judging how fast the airspeed indicator is increasing relative to how much grass we have left.   By a quarter of the runway gone, we were well on our way to rotation speed, so it was looking good.   55 knots, rotate and climb away at best angle (Vx) of climb rather than best rate (Vy) – we care about not hitting the trees, not how fast we can get to 1,000ft 🙂

Onwards to Sempringham Fen Farm Strip

Spotting this one was probably going to be harder and worth remembering that my dead-reckoning and wind calculations were all done on the Chart with Max Drift estimations so weren’t going to be spot on. What I knew from my map was that I’d have Spalding on the right, if I overflew it I was too far right of track, if it was somewhere off to the right in the distance, I’d be to far left.   I also knew that there was a railway line that came out of Spalding and curved round to the west, if I overflew that then I’d gone too far north – I didn’t think the instructor would let that happen, but I was trying to come up with a plan to narrow down the big flat world outside.   Being really optimistic I knew the route crossed South Forty Foot Drain running north/south – I was hoping I’d spot that, if I spotted the crossing for that drain, Sempringham would be on my left.

Of course all best laid plans……I knew I was ball park in the right area, but ~4nm out I couldn’t see it, with hindsight I think I was a little fixated on the idea that it would be in front of me (being a bit optimistic about flying a perfect heading perhaps!).    The instructor asked if I gave up and wanted him to point it out to me?   Ok I give up.

Pointing to the left, about 4-5 nm away was what to me at the time looked like the thinnest strip of grass ever.  You’re joking that’s an airfield right?    It was straight and with a house & barn at the end it was the right sort of shape, but as we got closer, from 2,000ft it still looked incredibly narrow – even if we forget the length!

Impress or fail, we’d have our answer in a few minutes.

Setting up the circuit, I saw a good north/south ditch type thing to the east of the strip that I decided to use as a reference for the base leg.    I didn’t want to fly a silly sized circuit, but I didn’t want to turn and find myself halfway down the grass strip at 600ft either, this ditch seemed like a good sized compromise to a reasonable circuit shape.

On approach my eyes and brain were working overdrive on airspeed and watching the window.   Window, Airspeed, Window, Airspeed.   I took one comment from the instructor to just keep my airspeed up a little as I went through 60 knots – wind consideration here is critical, light winds need as much consideration as gusting etc.   Even so, I was really trying my hardest to put this plane down right at the very start of the strip.

Just going through 50ft the plane sank, I jumped on it and applied a little throttle to counter, caught it beautifully and it corrected just nicely enough to be able to take it back off again and touch down only feet from the start of the runway.   I couldn’t have been happier with it.

Full power, tons of runway left, which is saying something as it’s only 460m end to end!

Another circuit and again I really wanted a spot on landing for the full stop, just to show it was no fluke.

I used the same circuit points as before, they seemed to work out nicely and again went for ensuring I was totally in control of my airspeed on the approach with a constant picture out of the window.   Pointing the plane at just a few feet before the start of the strip for where I wanted the plane to go and using the throttle to keep the airspeed in check – I was still getting the hang of point and power technique, but having done only a few landings using it, I can assure you that post learning, it’s really the way to do it if you want accuracy.

Touch down, nice and soft and right where I wanted it to go at the beginning of the runway, we were down to taxi speed with around half the strip to go.

I chalk this one up as probably the best landing I’ve ever done.

G-MEGS:  Landed at Sempringham Fen Farm Strip

G-MEGS: Landed at Sempringham Fen Farm Strip

The best places to land involve those places that have coffee and cake, with much thanks, both were on offer.   Flying, cake and coffee – I see your hobby and raise you, it doesn’t get any better then this 🙂

Back to Cambridge

Another short field take off and it was off for a really quite pleasant flight back to Cambridge, funny really that some months ago Spalding/Cambridge was a route on one of my first solo Nav’s and I must have concentrated soooo hard to not miss Spalding.   Now I was just glancing at the map, spotting the land marks and really flying with my eyes out of the window just enjoying the views and a casual chat on the way home.

Great day to be flying.

Back on the ground at Cambridge the chief flying instructor said he was happy with my flying and didn’t need to see any more.   My training record now shows I’m cleared to fly the club aeroplanes into farm strips!

Farm Strips:  I’m hooked, more!

It’s been one of the best courses, different to when you’re trying to be formally taught how to fly.  Yet challenging and I really feel I expanded by skill set from doing it.   Not just in terms of flying, but also increasing my confidence to try find and go into shorter strips on my own, with the right training to be able to do it safely.

Hand on heart, I find myself completely hooked on flying farm strips now.

I’ve done a bunch of big runway landings, I trained at one etc.  Big airfields bring different things to the party, lots of radio work, procedural joins and accurate circuit flying being critical etc.  but for the challenge of the landing and even the challenge of finding some little patch of grass in the middle of nowhere. I found myself wanting to just get out there and do more farm strips – I started to wonder who might let me come land in their garden if I asked nicely enough 🙂


Farm Strip Skills: Part #2

October 21st, 2014 by PHC | Permalink

PLOG on the Chart to Marshland

PLOG on the Chart to Marshland

On arrival this looked like it was going to be a good day, but the longer you looked up, the worse the clouds became.

Obviously then the answer was to stop looking up and go get on with it!

All the planning on the Chart :  Wiz Wheel, forget it.

I’d been told not to plan this trip out to Marshland, we’d do it on the fly.

Now to learn a few more notations & symbols for drawing a PLOG on to a chart.   If it’s good enough for the military to have all their planning & radio frequencies on their chart, it’s good enough for me.

Normally you’d work out the wind corrections on a wiz wheel (Flight Computer), then work out heading corrections from that.  Very accurate, so long as the wind forecast is accurate.   However, you can’t do this easily if you’re diverting, so there’s a good case for learning to fly using Maximum Drift and some rules of thumb.

Maximum Drift

A quick calculation will give you a pretty accurate Maximum Drift (due to wind) you might experience on a flight:

Step 1 :  Calculate the max drift if the wind was perpendicular to the route being flown.

Max Drift = (60 / True Indicated Airspeed) * Wind Velocity Forecast for the Altitude being flown

Math in an aeroplane is actually harder then it sounds, even for math you’d find easy on the ground.   This is because you’re now traveling at ~100+mph, have people talking on the radio to you or have to listen in case they start, are trying to maintain a heading and altitude (and don’t forget to keep looking out the window!) – the constant ‘buuuuur’ of the engine also doesn’t help concentration.

For a Cessna 172, with a typical indicated airspeed cruise of ~100 knots, you can optimise step 1 further by saying 60 is close to 50 and IAS (Indicated Airspeed) and TAS (True Airspeed) will be close enough at cruise speed:  so 50 / 100 equals 0.5.

Now our equation becomes:

Max Drift =   0.5 * Wind Velocity Forecast for the Altitude being flown

Sure you now have a bit more error in the system, but here’s an example, lets say the Track we want to fly is 080 Degrees and the Wind is forecast to be 165/25  for our flight altitude.

If we do the equations above, with TAS = 100 knots.

Accurately  :      (60 / 100)  *  25   =   15  degrees

Estimate     :      25 / 2  =         12.5  degrees.

So with the wind at 85 degrees to our intended track and a reasonably high wind of 25 knots, rounding up, the quick estimate is out by 2 degrees.

Over a 10-20nm leg of journey, this error is going to be very negligible (i.e. With 2 degrees error, after 60nm, you’ll be 2 nm away from where you thought, so over a typical 10-20nm leg the crude method would put you, out by 0.3 – 0.6 nm).    If you still don’t like that small amount of error, remember that TAS here has been approximated to the Indicated Airspeed cruise of 100 knots.   TAS will actually be higher by a few knots, at 2,000ft AMSL in a Cessna 172 with IAS of 100 knots, flaps up and in level flight TAS will be very close to 104 knots.   Do the accurate math above using a calculated TAS, but use only the IAS 100 knots for the crude method and you’ll find that now the error is under 2 degrees.  It’s pretty good and probably more accurate then the error and danger of going eyes down while you get a flight computer out and start remembering equations and how to do division on the thing!

Step 2 :  Using the clock rule system, adjust as applicable for the angle you’re flying relative to the above wind (you might be flying straight into/with the wind).

Take the difference between the track on the chart and the forecast wind direction, multiply the number from step 1.  by

  • 1/4  if the difference is up to 15 degrees,
  • 1/2  > 15 and <= 30 degrees.
  • 3/4 if up to 45 degrees.
  • For anything else assume Max. Drift (e.g. multiply by 1).   This will give you a slightly pessimistic outcome.

Example:

If Step 1 gives us a Maximum Drift of 15 Degrees, then using the details from the above (Track we want to fly is 080 Degrees and the Wind is forecast to be 165/25 ).

165  –  80  =  85  Degrees difference, so we can just assume that we’re going to get the full 15 degrees of drift.

If we changed our track later on in the flight to say 140 degrees, then

165 – 140  =  25  Degrees Difference, so   15 * 0.5   (Multiply by a half as it’s greater than 15 Degrees, less than 30)   = 7.5    Degrees of drift.

If you’re still feeling bitter about my approximation method on step 1 above and have a desire for accuracy, it might be worth noting now that in the above condition with 25 degrees of difference, the drift error between the approximation and the precise calculation is less than 1 degree!


Lets go flying ………even if those clouds do look a lot darker.

The briefing was far shorter then your typical PPL training briefing, but even so by the time we got out to the aircraft, dark clouds on arrival, were looking lower and darker then they were before.   We discussed going again, was it worth it, should we go have a look anyway or not?    I elected we just go have a look.   In my heart I knew this was being optimistic, but the CFI wasn’t going to say yes if it was entirely pointless or unsafe and even if we just went up, turned round and came back, it would still be valuable experience of the weather with the proper instruction available etc.

A wall of darkness

As we set heading over Point Alpha, it didn’t take very long to know we could scrap this 🙁     Already at 1,700ft and being pushed down with every minute flown, the north of Cambridge looked like a wall of darkness and cloud – maybe, just maybe, if we dropped to ~1,000ft and pushed on past Waterbeach, maybe it’d clear.

The instructor asked what I wanted to do?   While on the ground I was of the view that there’d still be some things I could learn by going up in less then ideal starting conditions with experienced instruction.   Now I just felt this was more a question of “but should you carry on” rather than “Do you want to”.

I saw no point, it was a lot of maybe’s – that might not come true and if they didn’t how bad would it be when we gave up and tried turning round?   Even if they did come true, we’re aiming for a grass strip in the middle of nowhere, when we get there we’ll have no idea of the surface winds and even if we can get a rough idea of them, probably it’ll make for a hell of a challenging landing and I’ll come away from it feeling rubbish and like I’d forgotten how to land.   That would add no value to this objective.

I elected to call it a day and turn back for Cambridge.

Air Traffic heard our call to return and asked if there was a problem, this is a pretty normal response if you call to return only ~5nm from take-off.   I reassured them that it was just a return due to weather and they let us come straight back in on a Right Base join, which was helpful both for the deteriorating weather and to keep my costs down 🙂

Epic Wind shear:   Falling at ~3,000ft/Min

As I lined up on final approach there was a crosswind and you could feel it gusting hard on the controls.   I’d had worse on the way out to Calais, where almost full opposite aileron control was required to keep a Cessna straight, but now we were trying to land and there’s a big difference between keeping it straight at 2,000ft and keeping it straight at 500ft.

Still I was happy I was on it for this landing, the instructor wasn’t asking for control so they still had faith too 🙂

Then as we passed through 250ft, we just fell!    In ~2 seconds we dropped from 200ft to 100ft, 50 feet a second (or 3,000ft per minute!!)

Throttle Fully open, the Cessna managed to get lift again.

The window outside went from a happy picture, to the runway filling the screen in milliseconds – we’d just dropped out of the sky, for that second or two there was no flying involved, we’d just fallen straight down.    It’s a moment like this that makes you appreciate being in a C172 and not something with less power.  However, Cambridge is a mile long runway, so once recovered and flying again, the CFI said I could just re-land it a bit further down the runway – it meant we had to back track after landing but, still better than a full go around.

Back on the Ground Safely

Once safely back on the ground with time to reflect, the CFI said that the natural reaction of trying to pull back on the controls with only a little power would have been absolutely no good and we’d probably have just slammed the tail of the plane into the runway – he also said it was probably the worst wind shear he’d been in, I take that as meaning it was about as bad as it can get.

Still, it was recovered, we landed safely and I felt I took some good things away from it all – even if we didn’t reach our destination, the real skill in aviation is to know when to quit, rather than just press on regardless 🙂